
We have been working hard these last few months to bring you some amazing new updates and features to the Booth Junkie software for your mirror and photobooths.
Below is a sneak preview of what is to come in the all new Booth Junkie V5!
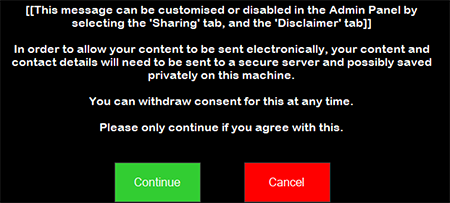
When sending a photo via SMS or Email, you now have the option to display a disclaimer (or any other message), asking the user to consent to their photo being uploaded to a secure server in order to be sent via SMS and/or Email.
You can customise the message, as well as enable or disable the message, by opening the Admin Panel and selecting the “Sharing” tab, followed by the “Disclaimer” tab.
You can now copy all of your event photos directly to a USB memory stick from within the software.
This will clean up any unneeded files from the software and copy everything to the memory stick in it’s own folder ready for the customer, or even for your own backup.
You can find this new feature in the “Options” tab inside the Admin Panel.
![]()
You can now view all of your licensing information, including the type of licence that you have, the expiry of your licence (if applicable), and the expiry of your support pack and/or premium features.
This will be shown at the bottom of the “Options” tab in the Admin Panel.
The print settings have now been moved to their own tab under the “Options” tab of the Admin Panel.This allows new print options to be made available, details of which, will be listed below.
This allows you to control whether or not you want to offer printing to your guests.
This may seem obvious to some, but for those who want to offer a digital only option with BoothJunkie, this feature is going to be used a lot by you.
A lot of users have asked for this feature, so we are very excited to release this one.Enabling this option will allow your guests to select how many copies of the photo they would like to print.
This is very handy if you offer a print per person, as the guests can enter how many of them would like a print and get the exact right amount.
You can control the maximum amount of prints allowed in any one session by changing the “Maximum prints per session” option on this page.
Enabling this option will take the 2×6 strip from the software, and duplicate it side by side into a 4×6 sheet, allowing most printers to be able to cut a single sheet of 4×6 media in half, resulting in the same image on both halves.
This option should be used for anybody using the Mitsubishi range of printers, including the CPD70DW and CPD80DW printers, amongst others.
Using this option, the software will always send 1 additional copy to the printer, which is useful for when offering a guestbook with your services.
No matter how many prints are requested by the users, the software will always print you just one additional copy using this feature.
With these new settings now being introduced, we are happy to announce that any of our users who are also using the Primer Impressa IP60 printer, can now print just one single 2×6 strip print, without the printer trying to, or having to, print an additional copy.
Depending on your print layout settings and paper orientation, you may find that you need to also enable to “Reverse Orientation” setting on this page in order for the prints to be printed correctly by the printer.
We have removed the option of switching between Legacy Live View mode and Modern Live View modes on the Selection Screen.
This will hopefully eliminate any issues with the Live View screen not rendering correctly on some computers and will make the entire experience much more user friendly.
In addition to the new Live View changes, we have rebuilt the webcam libraries too which results in a much cleaner, smoother live view capture for those of you using webcams, especially in pods or on Windows tablets.
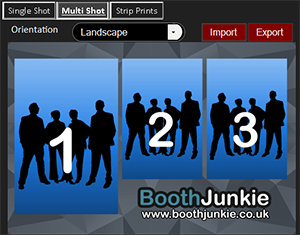
We have made a few very subtle changes to the Print Layout editor, most of which you will not notice, but the biggest change which may catch your eye, are the new numbers which appear on the image placeholders, indicating which image is which – very handy when designing multi shot printouts.
We have also changed the image placeholder from grey to blue, which makes it easier to see exactly where the image is against the canvas.
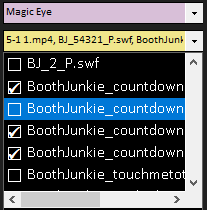
Another feature which we kept on promising, was to support random animations.
In the workflow editor, you will notice that when selecting an animation, you will now see a tick box next to each one.
With this, you can tick as many (or as few) animation files as you wish, and each time the software runs that line, it will pick a random animation from the selection that you have made.
This way, no two sessions have to be the same and you can offer a range of different animations at any point during the user experience for your guests.
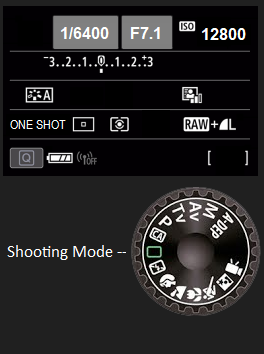 Brand new DSLR Camera controls
Our last update see the introduction of the new “External Flash Mode” feature, which allowed users to offer a Live View when shooting with a manual exposure and using a flash/strobe light.
This time around, we have beefed the entire thing up. You can now see from within the “Camera” tab exactly what settings are dialled into the camera, as well as the shooting/exposure mode on the dial.
Even better, you can now also change those settings from within the software itself (with the exception of the physical dial), and even set the software to automatically override the camera settings just before each shot – this is something which would be very handy if your staff team members accidentally adjust the camera settings whilst setting up their event and are not sure what they have changed.
We will be adding a new collection of animations, sound effects, and templates to our download library.
You can access this by navigating to the “Add Files” tab, and then the “Catalogue” tab in the Admin Panel.
We have also added some minor tweaks and bug fixes to the software, which as usual, will pave the way for some more exciting features which we are still developing for the software.