
This editor has been rebuilt from the ground up compared to the older app, with a lot more precision control than a simple drag-and-drop.
Where to find it
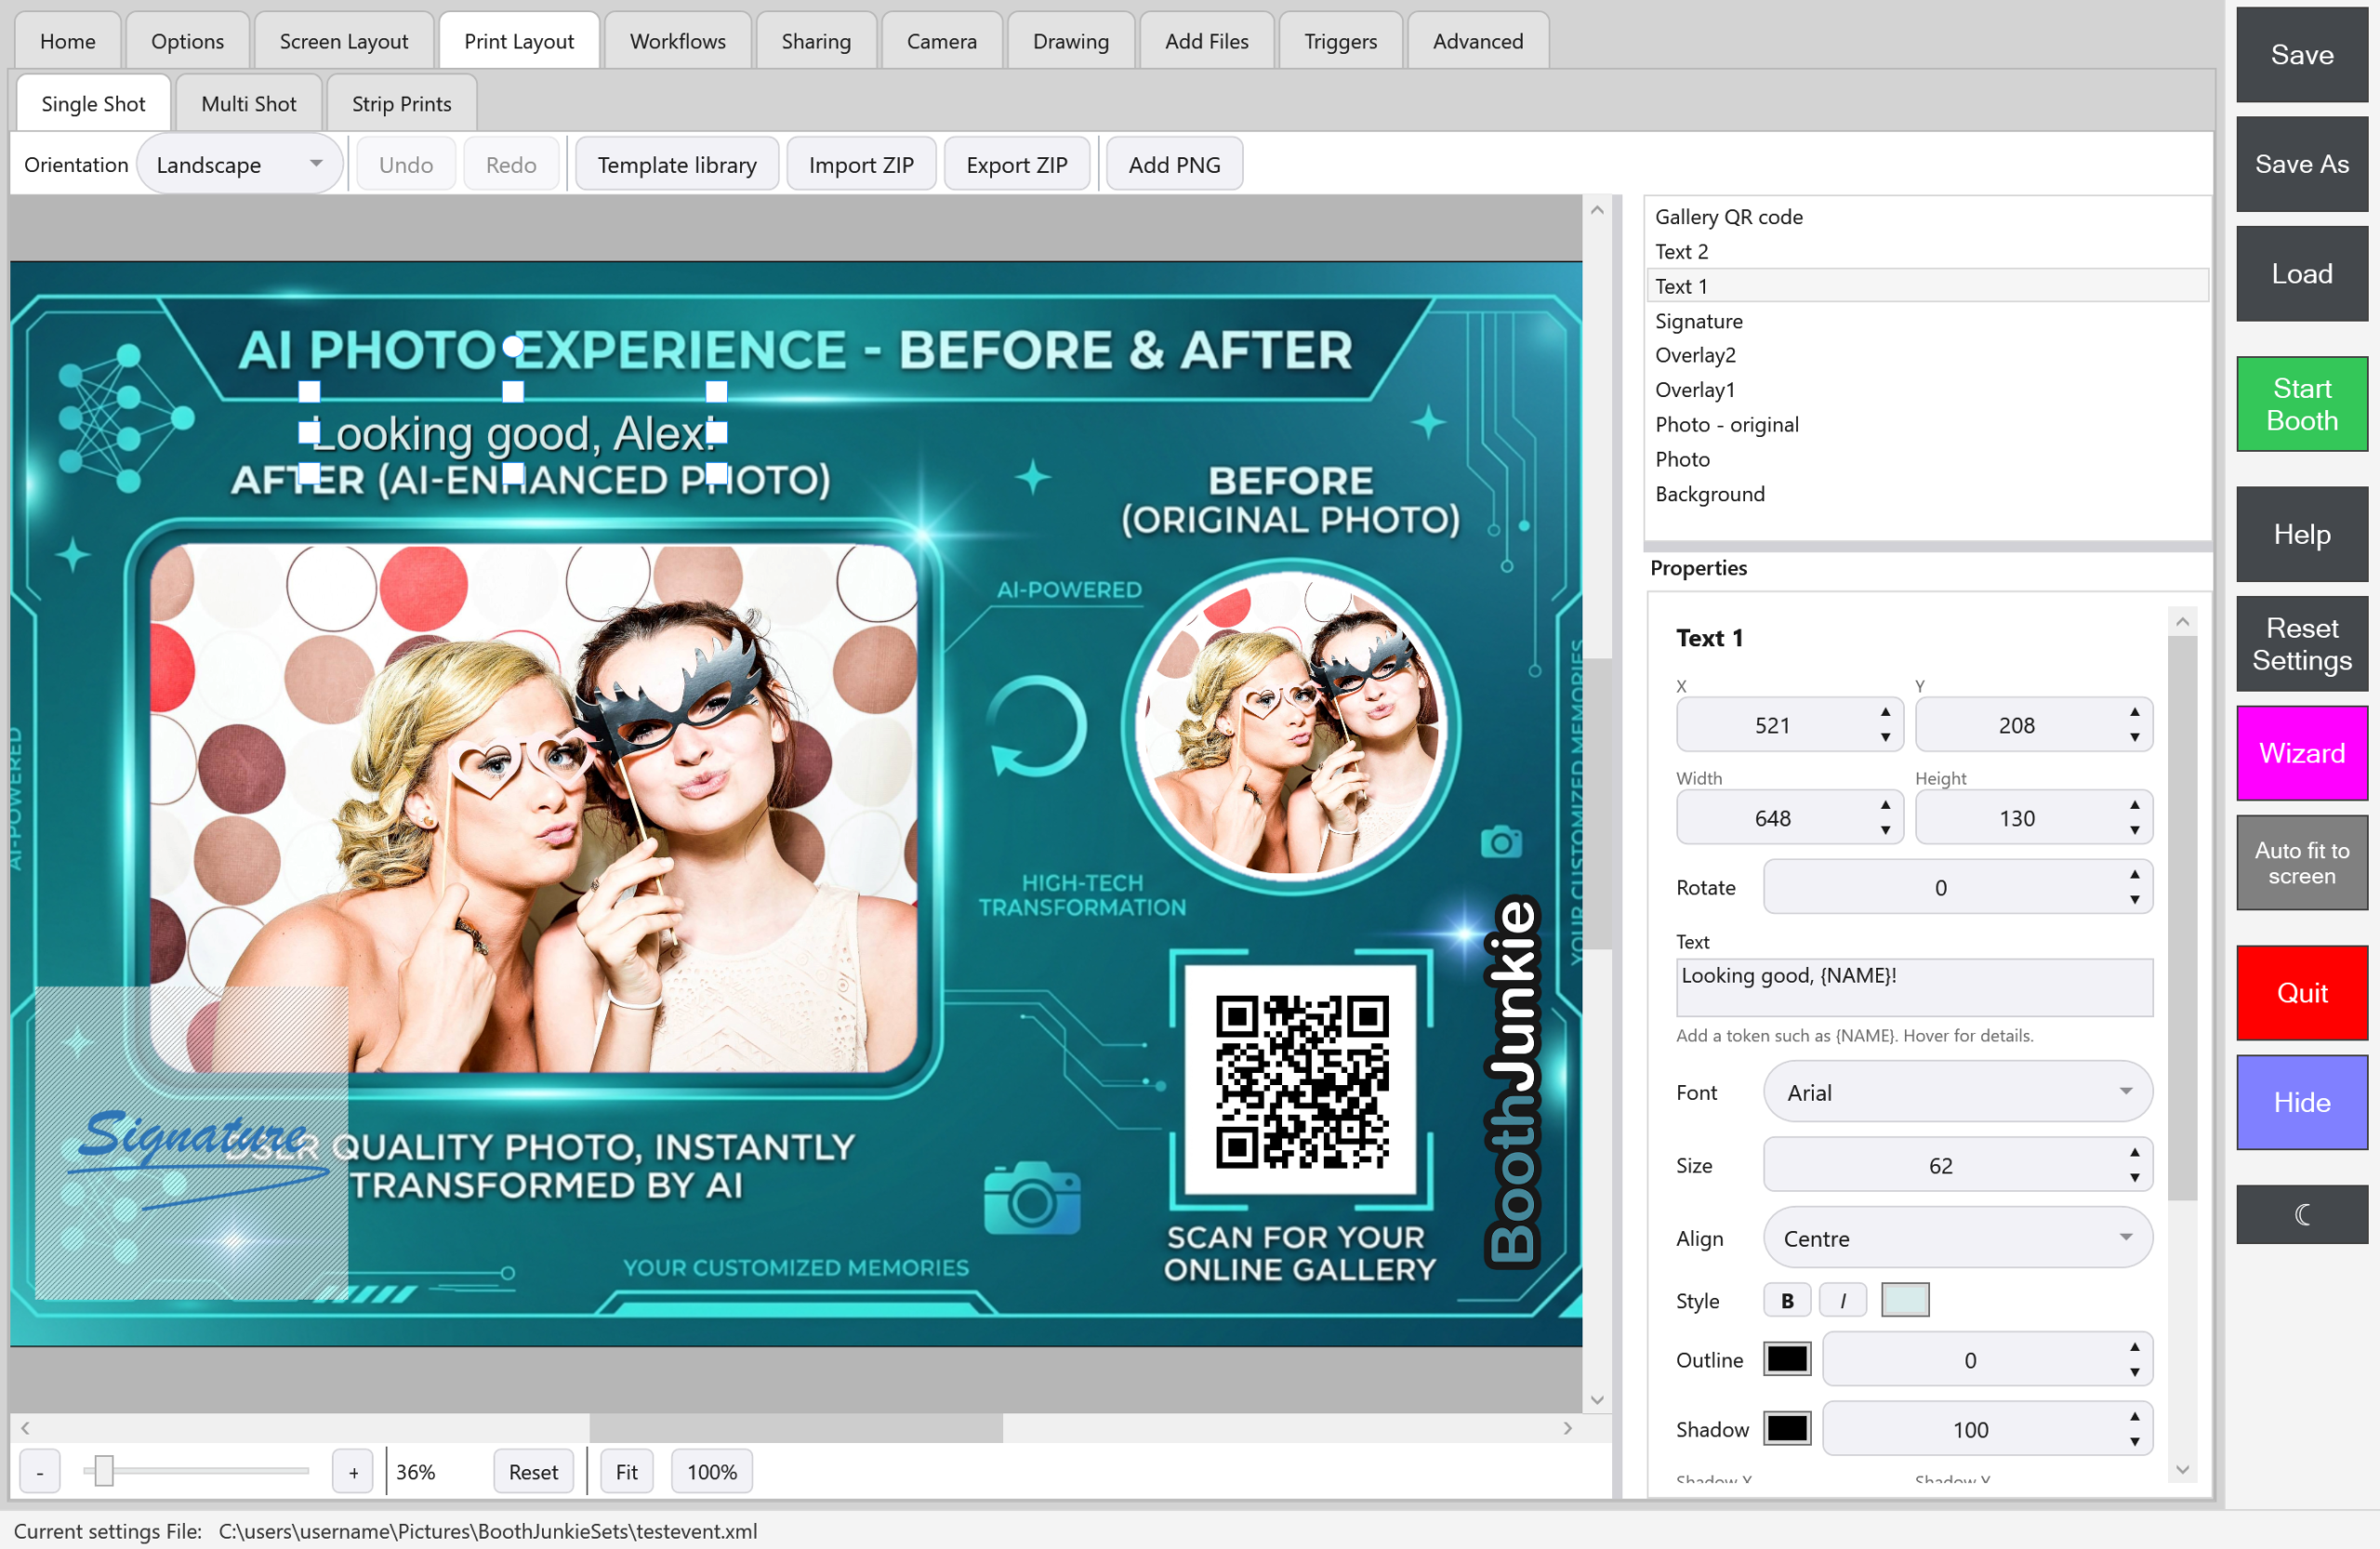
Admin Panel → Print Layout, with 3 separate tabs – Single Shot, Multi Shot, and Strip Prints – each with its own independent template.
What you’re building
A stack of layers, drawn bottom to top:
- Background;
- the photo layers: Photo, plus Photo 2 to Photo 4 on Multi Shot and Strip Prints;
- two Overlay layers, Overlay1 and Overlay2, for logos;
- a Signature layer, where a guest’s Draw step drawing lands, in Signature mode;
- two independent text layers, Text 1 and Text 2, each with its own font, size, colour and effects.
Single Shot also has a Photo – original layer for before-and-after prints, and every shot type has a Gallery QR code layer.
Good to know: There’s no “add a layer” step
Every layer that applies to a shot type is already there, just possibly switched off – there’s no separate “add a layer” step.
Select and move a layer
-
Click a layer on the canvas, or select it from the layer list on the right. Both stay in sync, so either way works.
Result: The selected layer shows resize handles and turns the cursor into a hand while you hover over it.
-
Drag it into place.
Holding Shift or Ctrl while dragging temporarily turns off snapping, for fine positioning that doesn’t want to lock to a guide line (see Snapping, below).
-
To deselect, click anywhere that isn’t a layer, such as the area round the canvas.
Result: The handles go away and the Properties box empties.
Good to know: Transparent areas click through
For an image layer (a logo or background with transparent areas), only the visible, non-transparent part of the image can be dragged – clicking a transparent area clicks through to whatever’s underneath, the same way it would in an image editor. Text layers don’t have this restriction, since there’s no transparency to click through.
Resize a layer
A selected layer shows 8 handles – one on each corner, and one on the middle of each edge:
- Corner handles resize both width and height together.
- Edge handles resize only that one dimension (top/bottom edges change height only; left/right edges change width only).
| Hold | While resizing |
|---|---|
| Shift | On a corner handle, resizes while keeping the layer’s original aspect ratio locked. Shift doesn’t do anything on an edge handle, since those only ever affect one dimension anyway. |
| Ctrl | Temporarily turns off snapping. |
| Shift and Ctrl | Shift and Ctrl work independently, so holding both locks the aspect ratio and resizes freely without snapping. |
| Alt | Grows or shrinks the layer around its own centre, so the opposite edge moves too. Alt works with Shift as well, and snapping stays off while Alt is held. |
Rotate a layer
A small round handle sits just above the top-centre resize handle, joined to it by a thin guide line. Drag it to rotate the layer around its own centre – the layer spins in place rather than drifting, and the Rotate field in the sidebar updates live as you drag (and dragging the sidebar’s Rotate value spins the layer on canvas, the same relationship in reverse).
Tip: Exact angles
Hold Shift while rotating to snap to 15-degree increments, which makes it easy to get a layer to exactly 0/15/30/45/90 degrees and so on.
Snapping
While dragging or resizing, magenta guide lines appear whenever a layer’s edge or centre lines up with the canvas’s own edges/centre, or with another layer’s edges/centre – letting you line things up precisely without typing exact numbers. Snapping is on by default; holding Shift or Ctrl (as described above) turns it off temporarily.
Good to know: Rotated layers don’t snap while resizing
Snap assistance during resizing only applies to layers that aren’t rotated at an angle (a layer left at its default rotation, or rotated to exactly 180 degrees, still snaps normally) – a layer rotated to an angle in between resizes without snap assistance, so don’t be surprised if guide lines don’t appear on a rotated layer.
Zoom and pan
Zoom (10%-300%) and pan are just for editing comfort – they never affect what actually gets printed.
| To | Do this |
|---|---|
| Zoom | Use the +/- buttons or slider in the status bar, or hold Ctrl and scroll the mouse wheel to zoom in and out centred on your cursor. |
| Pan sideways | Hold Alt and scroll the mouse wheel instead of the normal up/down scroll. |
| Pan in any direction | Hold Space and drag over the canvas. |
| See the whole canvas | Fit returns to the fit-to-canvas view. |
| See true print size | 100% shows the template at its true print resolution. |
Reset and the automatic zoom when you open a tab aren’t the same thing – a tab opens zoomed to fit the whole canvas, but pressing Reset afterward returns to a fixed 30% instead.
Need more room? Drag the divider between the canvas and the sidebar to make the sidebar wider or narrower, and drag the divider between the layer list and Properties to give either one more height.
Drag a layer off the edge of the canvas and it’s shown under a semi-transparent wash rather than disappearing – a visual warning that it won’t appear in the final print, not an error.
Show or hide a layer
Every layer has an Enabled toggle in the sidebar. Switching it off hides that layer from the canvas completely and leaves it out of the composited photo, without deleting anything – switch it back on any time to bring it back exactly as it was.
Undo and Redo
The Undo and Redo buttons cover dragging a layer on the canvas: moving, resizing and rotating it. You can also press Ctrl+Z to undo, and Ctrl+Y or Ctrl+Shift+Z to redo, while the Print Layout tab is on screen and you’re not typing in a box. Single Shot, Multi Shot and Strip Prints each keep their own history.
Important: Most changes can’t be undone
Nothing else can be undone: numbers changed in the sidebar (X, Y, Width, Height and Rotate), the Asset picture, Enabled, text, font, colours and effects, Fit, crop and shape, Orientation, Import ZIP and a Template library install. Double-check those changes before moving on rather than relying on Undo to catch a mistake.
Photos, text and QR codes
- Crop a photo or cut it to a shape. Every photo layer can be zoomed in and cut to a circle, star or other shape, and Photo – original lets you show the guest’s photo from before AI beside the AI result. See Cropping and Cutting Photos to a Shape in a Print Layout.
- Fill a photo’s box without stretching it. A photo layer’s Fit is Stretch (the default, which squeezes the whole photo into the box) or Fill, which scales the photo without distorting it until it covers the box, and crops what hangs over the edges.
- Print a guest’s name. Type a Data Capture step’s token, such as
{NAME}, into the Text box of Text 1 or Text 2, and every print shows what that guest answered. Each step’s Configure… window shows its token:{TEXT},{NUMBER},{EMAIL}or{CHOICE}unless you named it. See Using a Guest’s Name in Prints, Messages and AI Prompts. - Style the text. Text 1 and Text 2 each have their own Font, Size (text too long for its box shrinks to fit, down to 40%), Align (Top or Centre), Style (bold, italic and colour), Outline, Shadow and Glow. See Styling Print Text: Text 1, Text 2, Fonts and Effects.
- Put a QR code to the online gallery on every print. Switch on the Gallery QR code layer. See Putting a Gallery QR Code on Your Prints.
Other tools on this screen
The toolbar along the top of each tab has, from left to right:
| Button | What it does |
|---|---|
| Orientation (Portrait/Landscape) | Resizes the canvas but doesn’t automatically reposition existing layers, so check everything still fits after switching. |
| Undo and Redo | See Undo and Redo, above. |
| Template library | Browse Booth Junkie’s ready-made layouts for this tab’s shot type, and install one in place of the layout on the tab. Anyone can browse; installing needs an active Premium. See Using the Template Library. |
| Import ZIP and Export ZIP | Back up a layout or move it between machines. Import ZIP replaces the layout on this tab. Export ZIP takes the layout’s background and logo pictures with it, plus any fonts it uses from Booth Junkie’s own font library. |
| Add PNG | Brings a new logo image into the Asset list of Overlay1 and Overlay2. It doesn’t place the logo for you: select the Overlay layer and choose it from Asset. |
Every mouse and keyboard shortcut
| Hold or press | While | What it does |
|---|---|---|
| Shift or Ctrl | Dragging a layer | Temporarily turns off snapping. |
| Shift | Dragging a corner handle | Keeps the layer’s original aspect ratio locked. |
| Ctrl | Resizing | Temporarily turns off snapping. |
| Alt | Resizing | Grows or shrinks the layer around its own centre. Snapping stays off while Alt is held. |
| Shift | Rotating | Snaps to 15-degree increments. |
| Ctrl and scroll the mouse wheel | Over the canvas | Zooms in and out centred on your cursor. |
| Alt and scroll the mouse wheel | Over the canvas | Pans sideways. |
| Space and drag | Over the canvas | Pans in any direction. |
| Ctrl+Z | The Print Layout tab is on screen and you’re not typing in a box | Undo. |
| Ctrl+Y or Ctrl+Shift+Z | The Print Layout tab is on screen and you’re not typing in a box | Redo. |
Do you have to build one from scratch?
No – Booth Junkie ships with starter templates already laid out for all three shot types, including a working Signature layer position, so Print and Draw have something to composite onto from day one.
Tip: Check before your first event
It’s still worth opening each tab and checking your backgrounds/logos actually appear as expected before your first real event, rather than assuming everything’s ready untouched.
You can also start from one of Booth Junkie’s ready-made designs with Template library (installing needs an active Premium).
Templates from outside Booth Junkie work too: any PNG with transparency can be used as an overlay, so designs you already own carry over. Photo Booth Templates lists the design studios that sell them.
Premium: Library layouts and Premium
A layout installed from the library keeps printing its own artwork – its Background, Overlay1 and Overlay2 pictures – only while Premium is active. If Premium lapses, those pictures print as plain white until Premium is renewed (from Your Licences on your account Dashboard), and the Admin Panel tells you so. Text, photos, Signature and the Gallery QR code are unaffected, and layouts you build yourself, or import from a ZIP that didn’t come from the library, are never affected.