
Premium: AI needs an active Premium and AI credits
AI processing needs an active Premium, and every photo processed uses AI credits. The ready-made styles in the Style Library also need an active Premium. See How the AI Credit System Works.
If you’d rather not show a screen at all, the same step can give each guest a style picked at random from your list instead. See Picking an AI Style at Random for Each Guest.
What your guests see
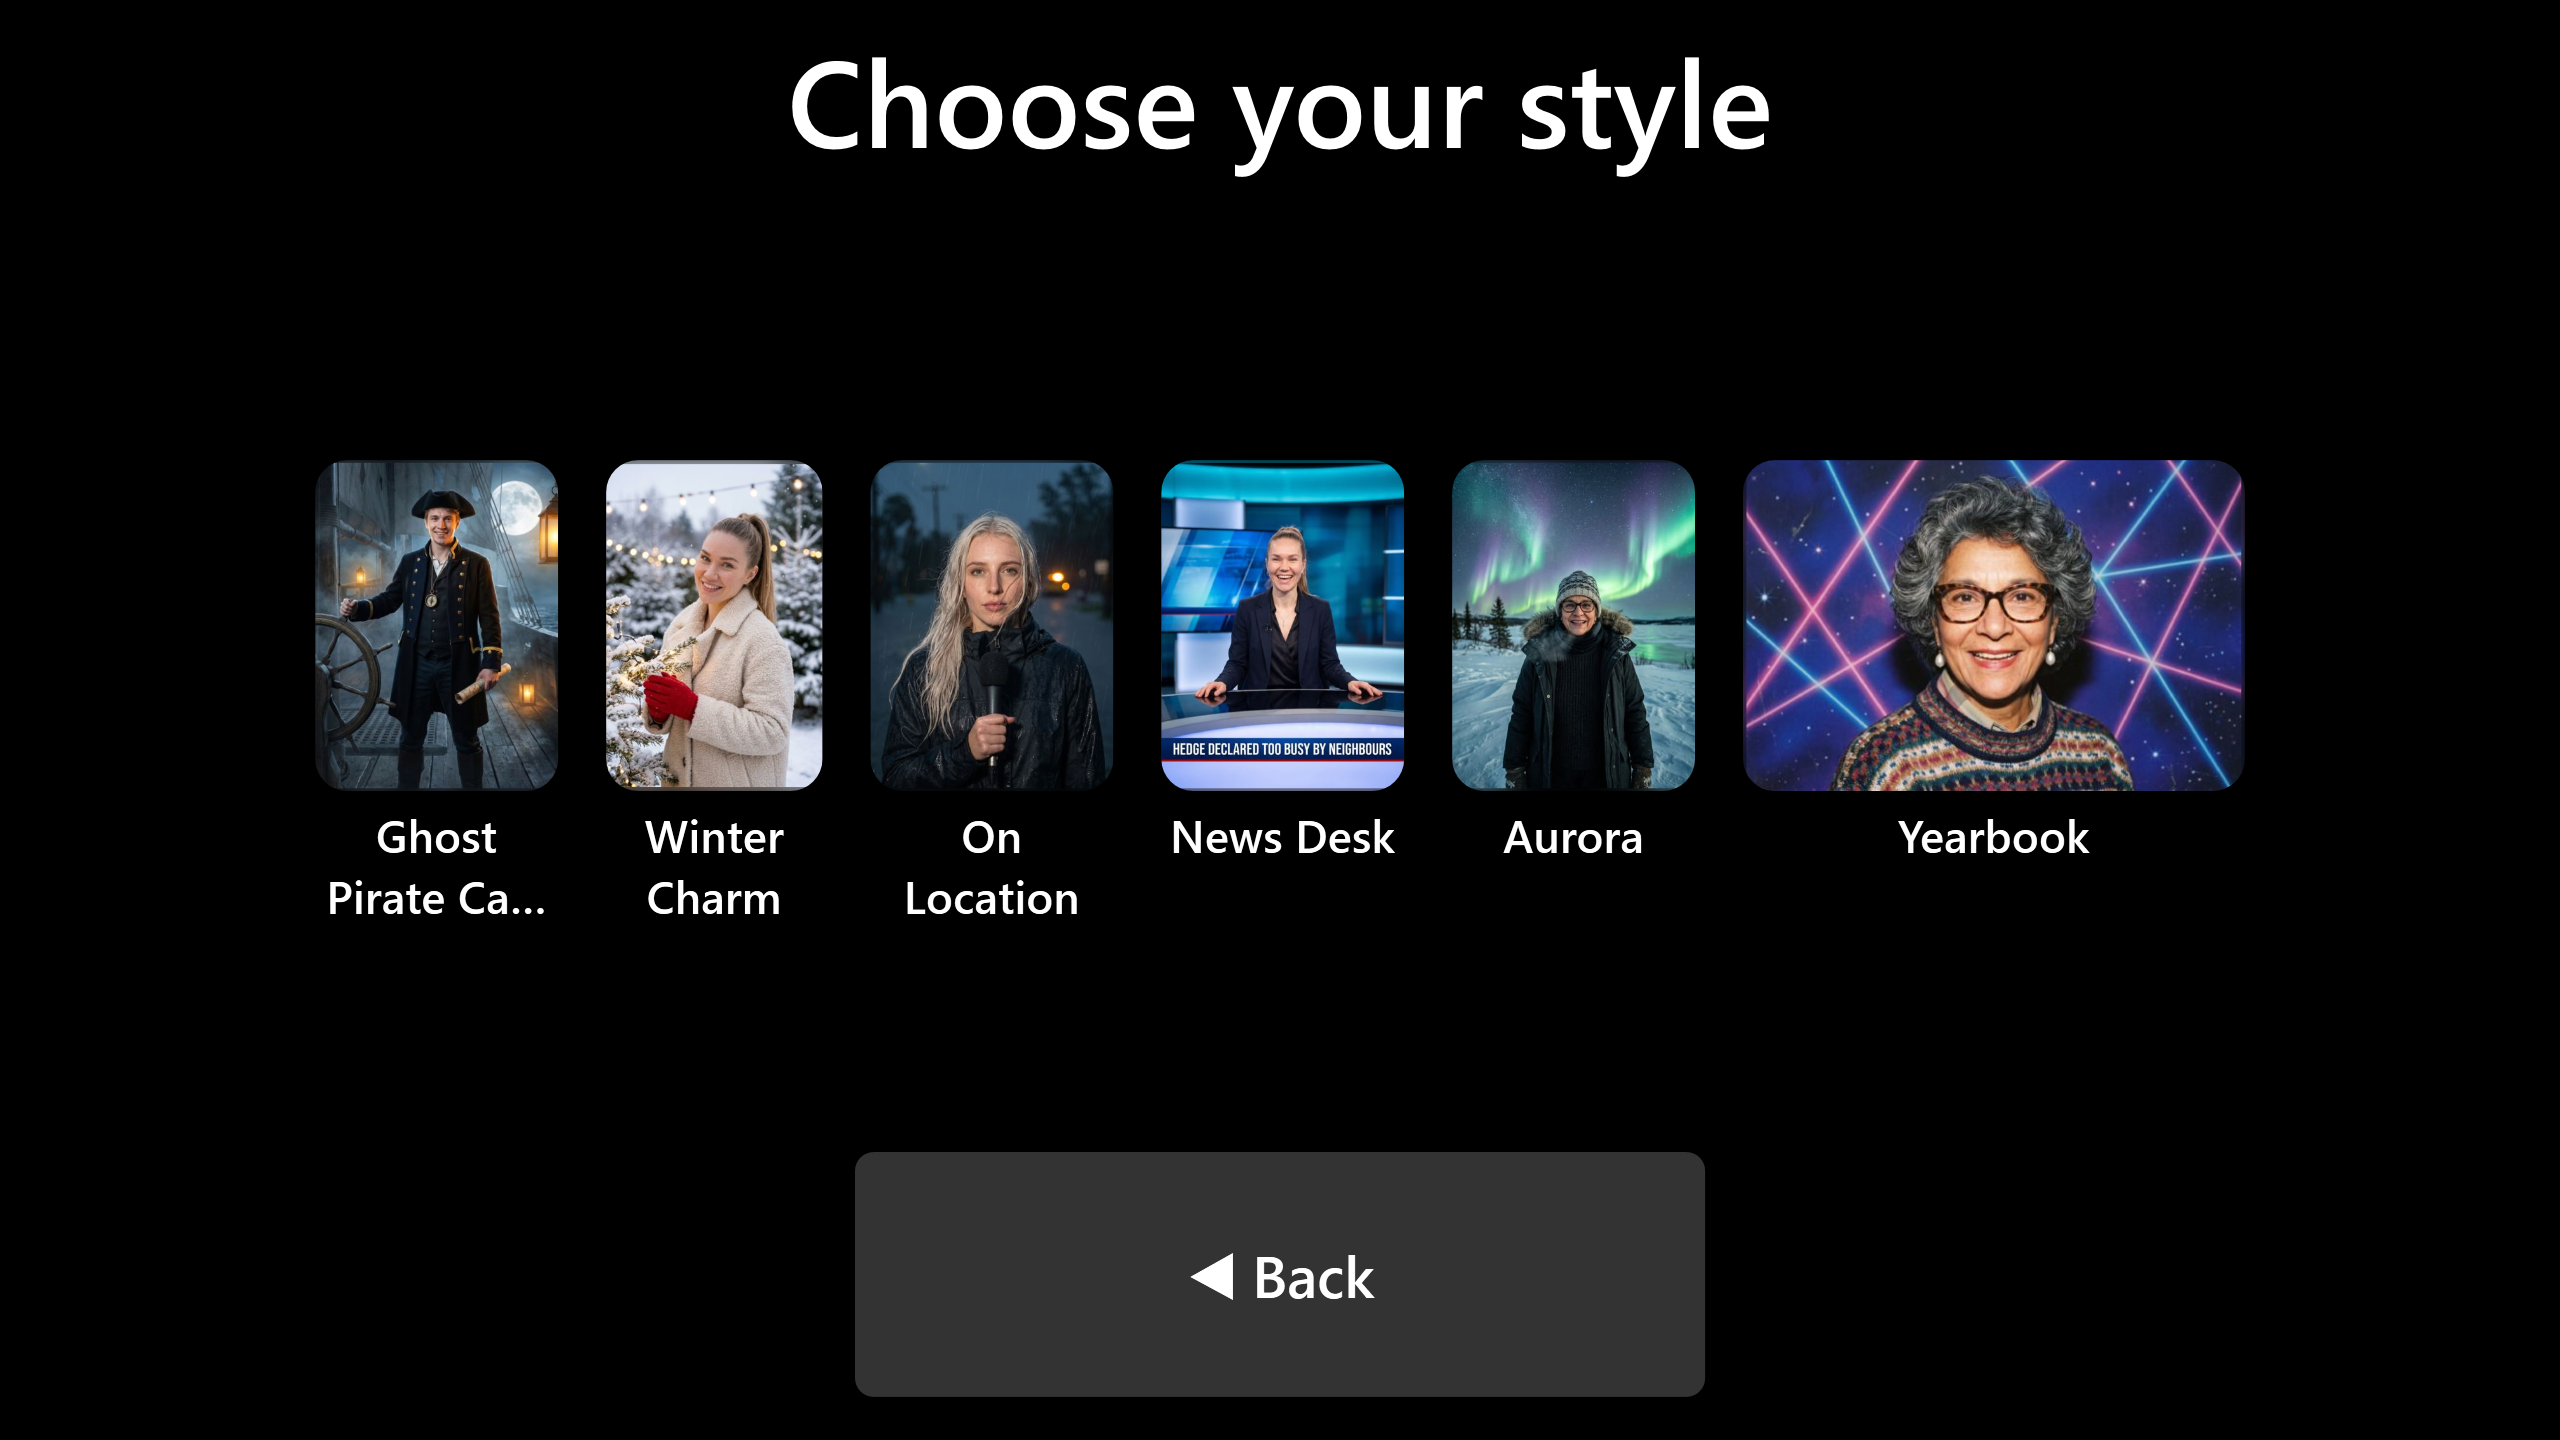
- The title, and a tile for each style with its picture and name.
- Page arrows and dots when there are more tiles than fit on one page. Guests can also swipe sideways across the tiles to turn the page.
- A Back button, which goes back to the screen before. You can also add a Skip button and a Confirm button.
A tap on a tile chooses that style and the guest carries on to their photo. For the first half second the screen ignores taps, so a tap meant for the screen before doesn’t choose a style by accident. If nobody taps anything, the booth goes back to the start after the time you set.
To change the tiles, the title, the buttons and how guests move through the styles, see Designing the AI Selection Screen.
Add the step
-
Go to Admin Panel → Workflows and open the workflow’s tab, for example Singleshot Workflow.
-
Find a spare row before the Photo step, and set its Type to AI Selection.
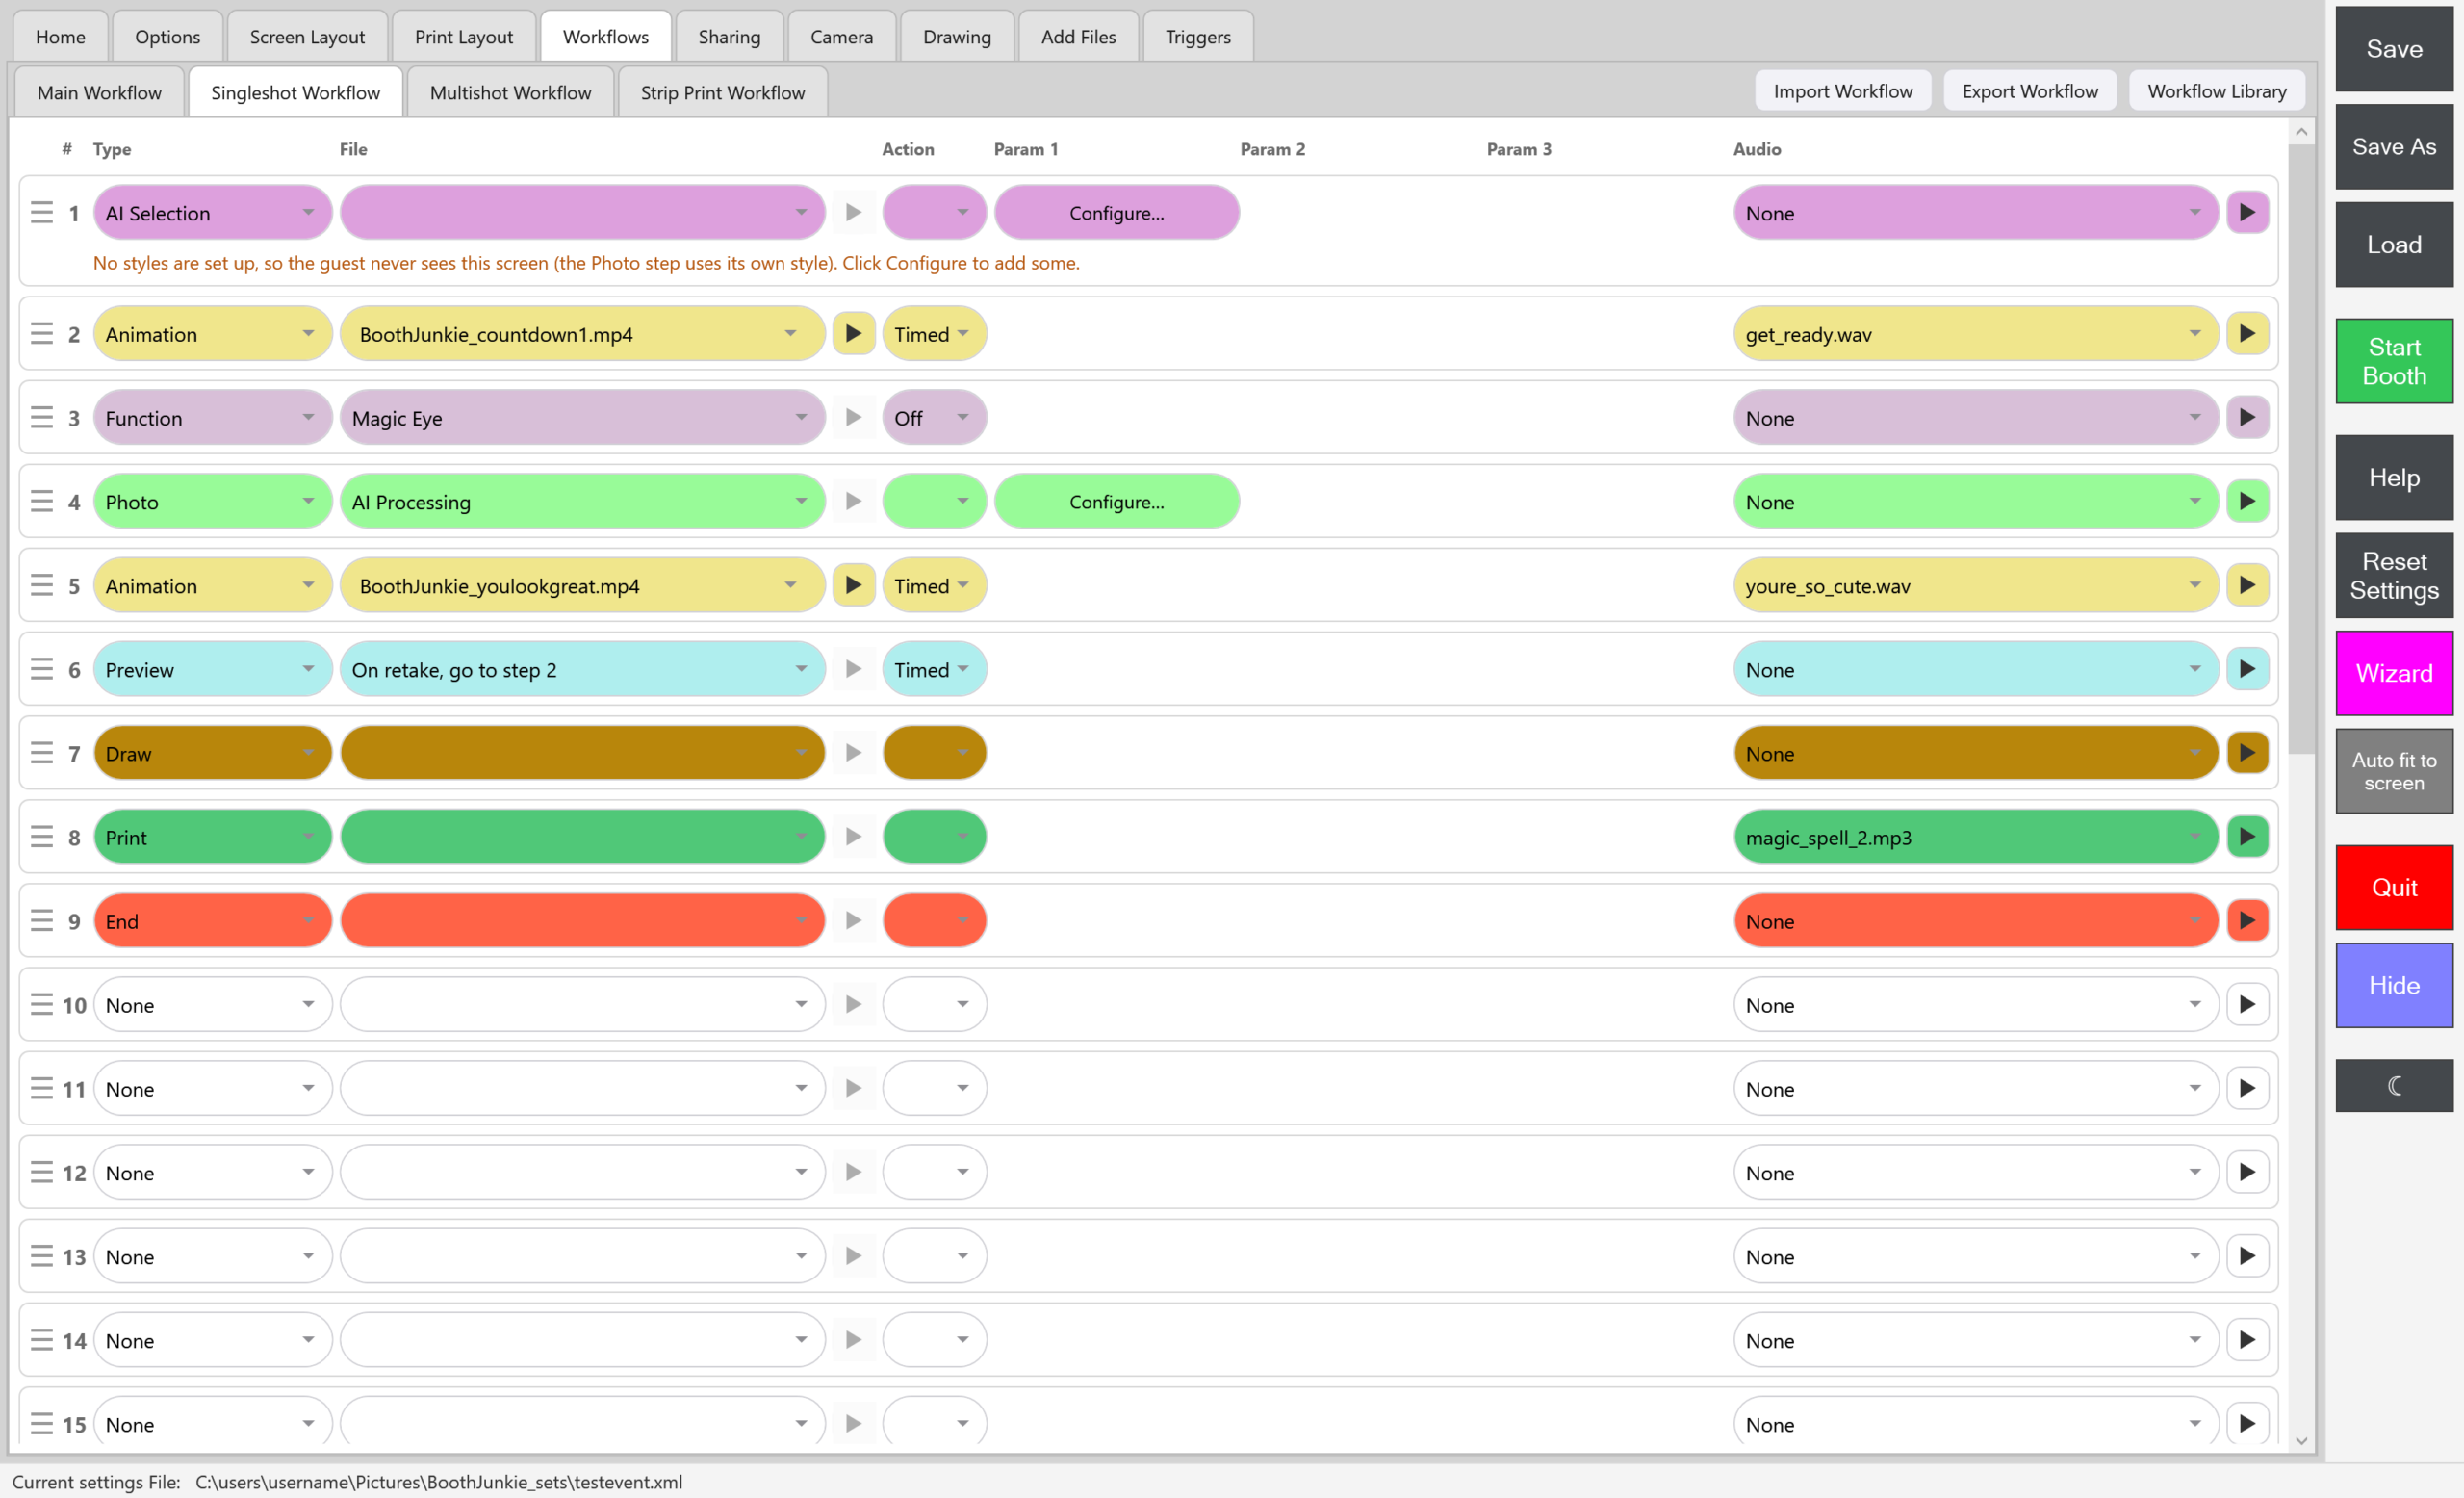
Until you add styles, the row says “No styles are set up, so the guest never sees this screen (the Photo step uses its own style).”
-
Set the Photo step that follows it to AI Processing.
The Photo step sends the style the guest chose in place of its own. Its own style is used only for a guest who skips. If no Photo step set to AI Processing comes after the AI Selection step, the Workflows tab warns you.
-
Select Configure… on the AI Selection row.
Result: The Configure AI Selection window opens.
Tip: Make it step 1 of the Singleshot Workflow
As the first step of the Singleshot Workflow, guests choose Single Shot on the Selection screen, then choose their style, then take their photo. If they change their mind, Back on the AI Selection screen takes them back to the Selection screen.
Choose the styles
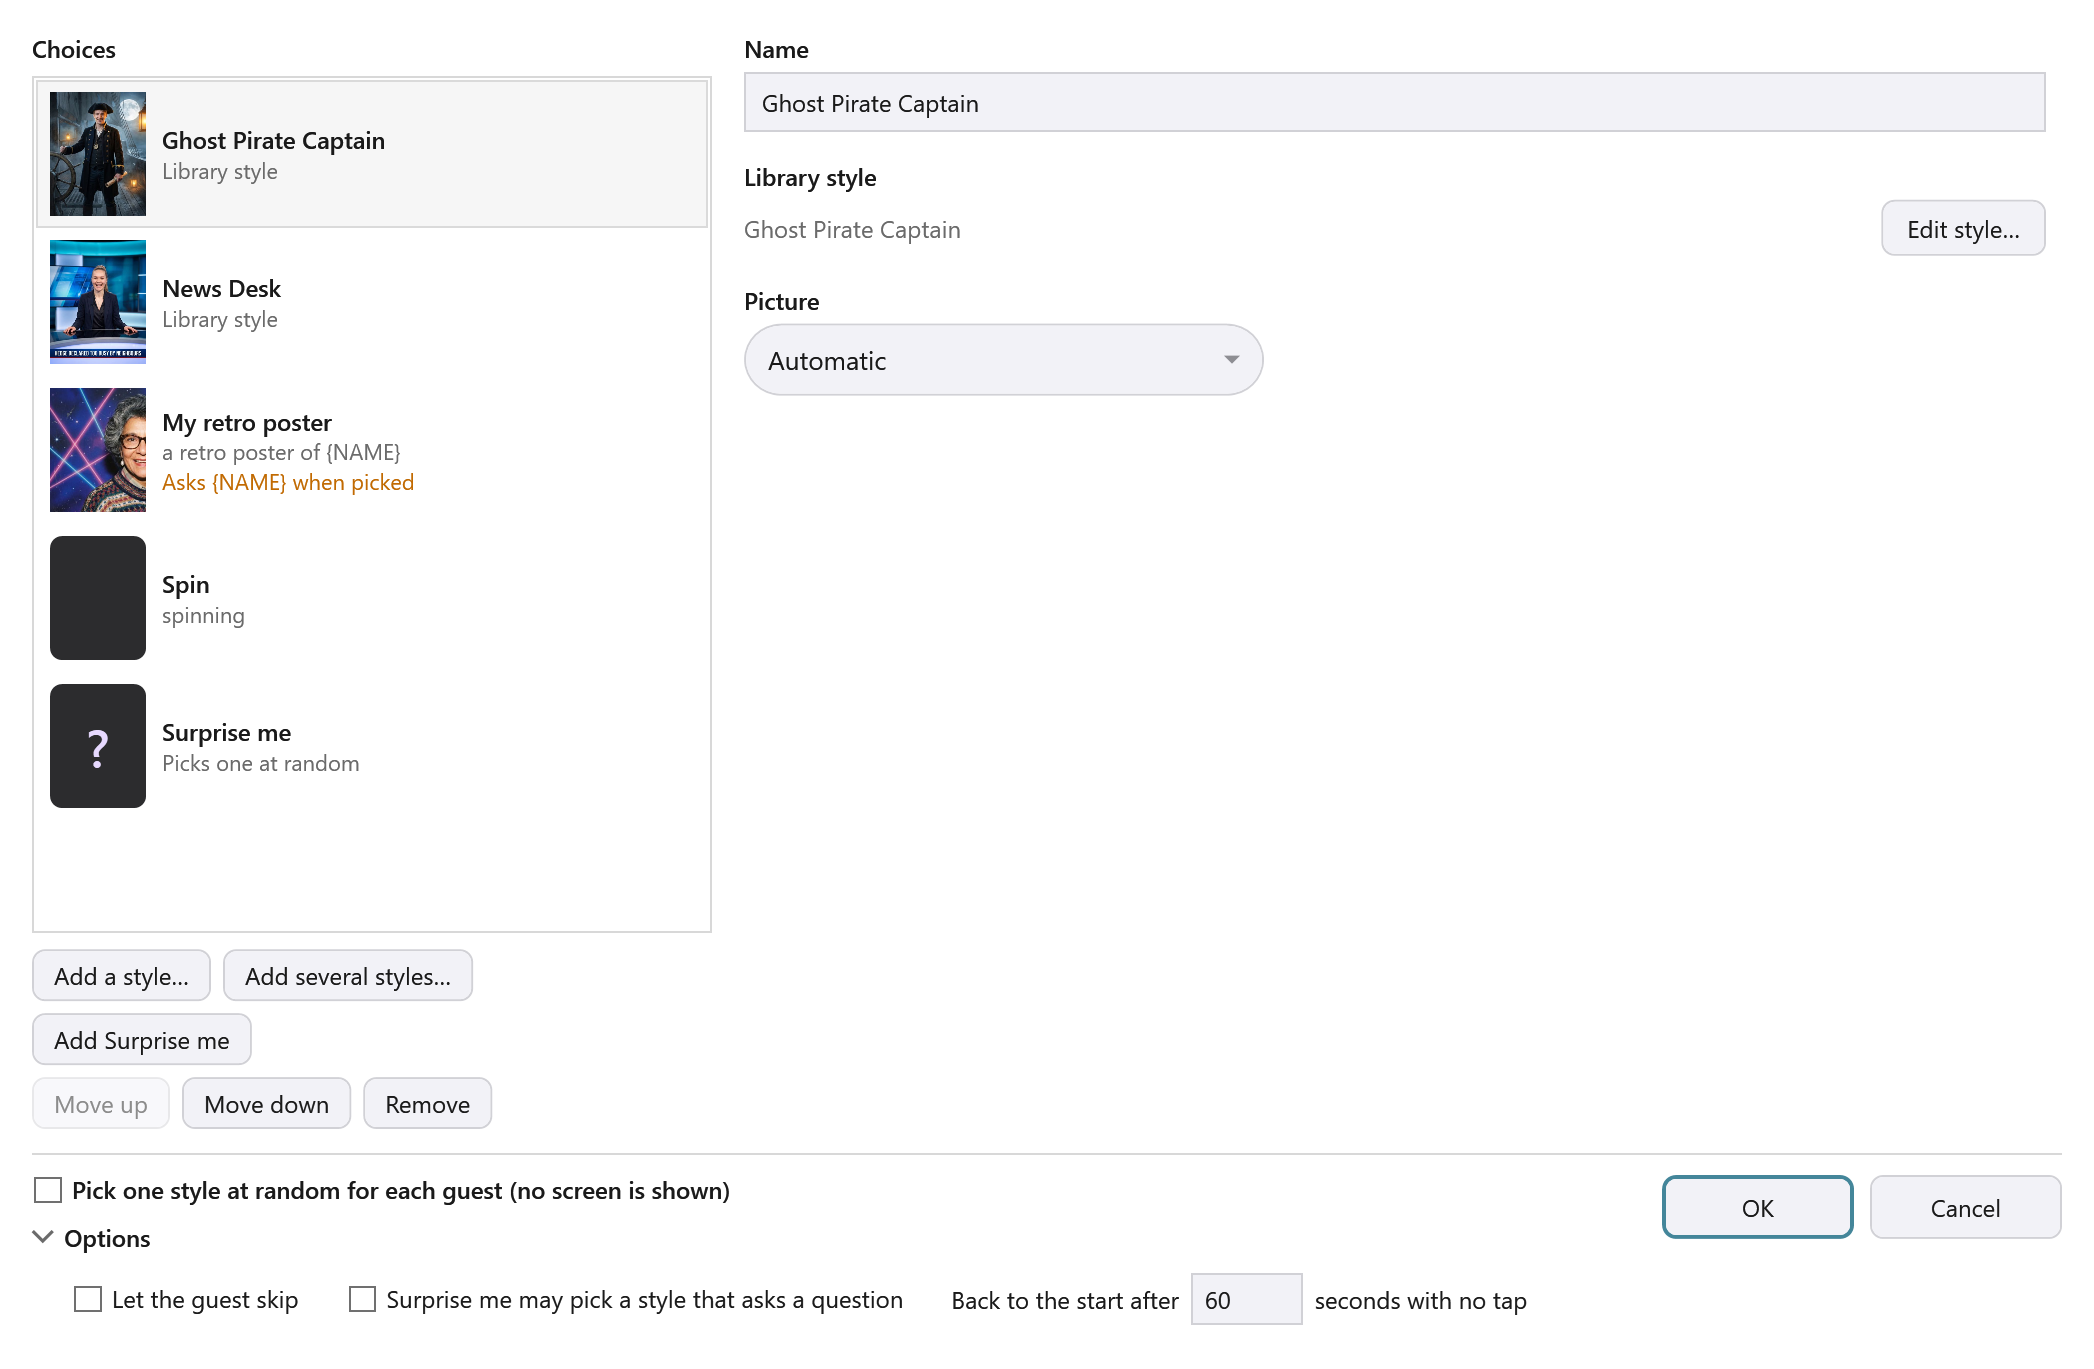
Use the buttons under Choices to build the list:
| Button | What it adds |
|---|---|
| Add a style… | One style. It opens the Configure AI window, where you pick a ready-made style from the library or write your own prompt, just as on a Photo step. See Using AI Processing: Your Own Prompt or the Style Library. |
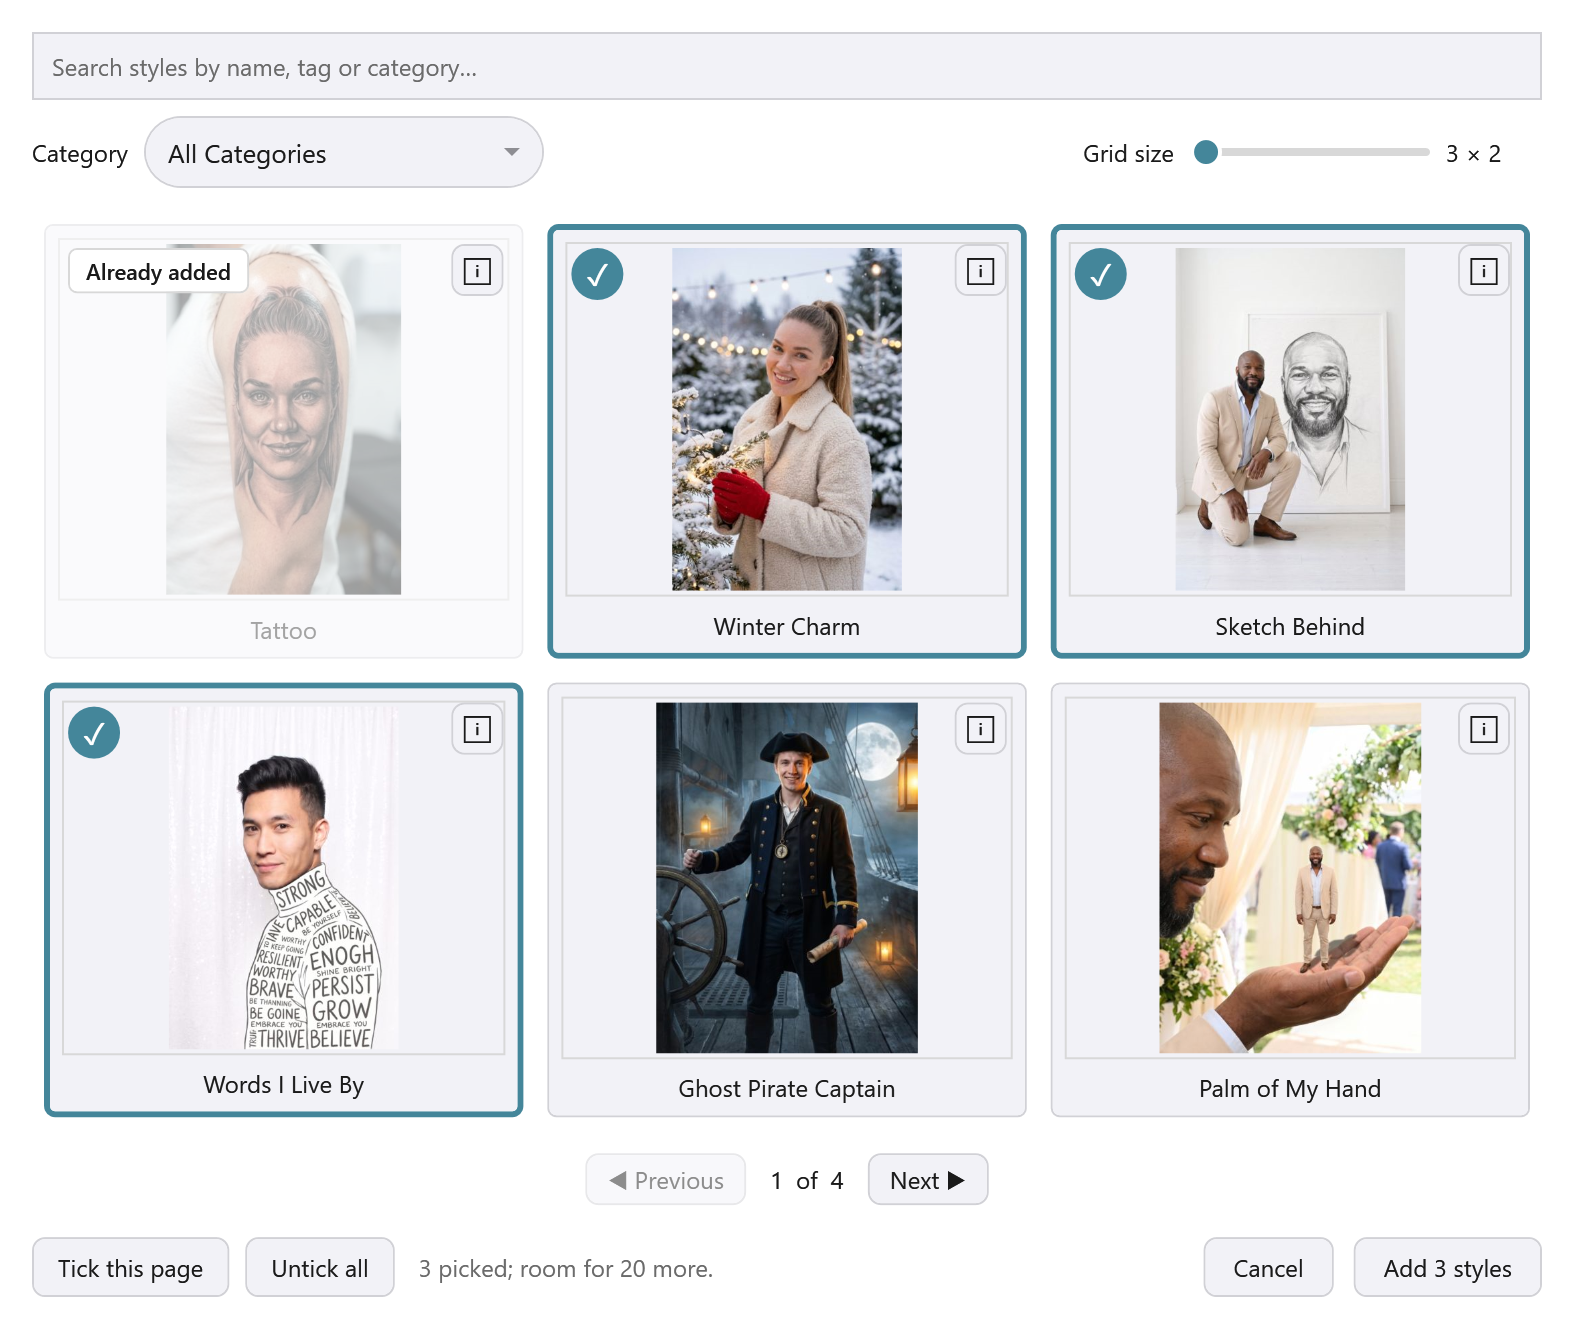
| Add several styles… | Several library styles at once. The Add library styles window opens with a tick on every style: tick the ones you want, or Tick this page, then press the button that counts them, for example Add 3 styles. Untick all starts again. Styles already in your list say Already added. |
| Add Surprise me | A ? tile. A guest who taps it gets one of your other styles at random. |
Move up and Move down set the order the tiles appear in, and Remove takes a style out. You can have up to 24.
Name, style and picture
Select a style in the list to change it.
- Name is the name under its tile.
- Library style or My own prompt shows which style it is. Edit style… opens the Configure AI window again, to change the style, set values for its words or press Send Test.
- Picture is what its tile shows:
| Picture | What the tile shows |
|---|---|
| Automatic | A library style’s own picture, or the name on a colour for your own prompt. |
| My picture | A picture of your own. Pick it from the list, or press Add a file… to add one. |
| My animation | A video from the booth’s animations. Add your own videos on the Add Files tab. |
| A picture made from my prompt | A result from your own prompt. In the Configure AI window, press Send Test, then Use this picture for the tile under the AI Preview. |
| Just the name on a colour | The name on a plain colour, which you can choose. |
Good to know: Send Test uses credits
Send Test is a real AI request, so it uses AI credits just as a guest’s photo does.
Styles that ask the guest a question
Some styles use a word from the guest, such as {NAME}: your own prompt can use one, and so can some ready-made library styles. The list shows these with Asks {NAME} when picked.
A guest who chooses one of these is asked for the word straight away, on the usual question screen, and then carries on to their photo. They aren’t asked if the answer is already there:
- a Data Capture step before this one asks for the same word, or
- you’ve set a value for the word in the style’s Configure AI window, under Values for the guest’s answers. A guest’s own answer always takes the place of that value.
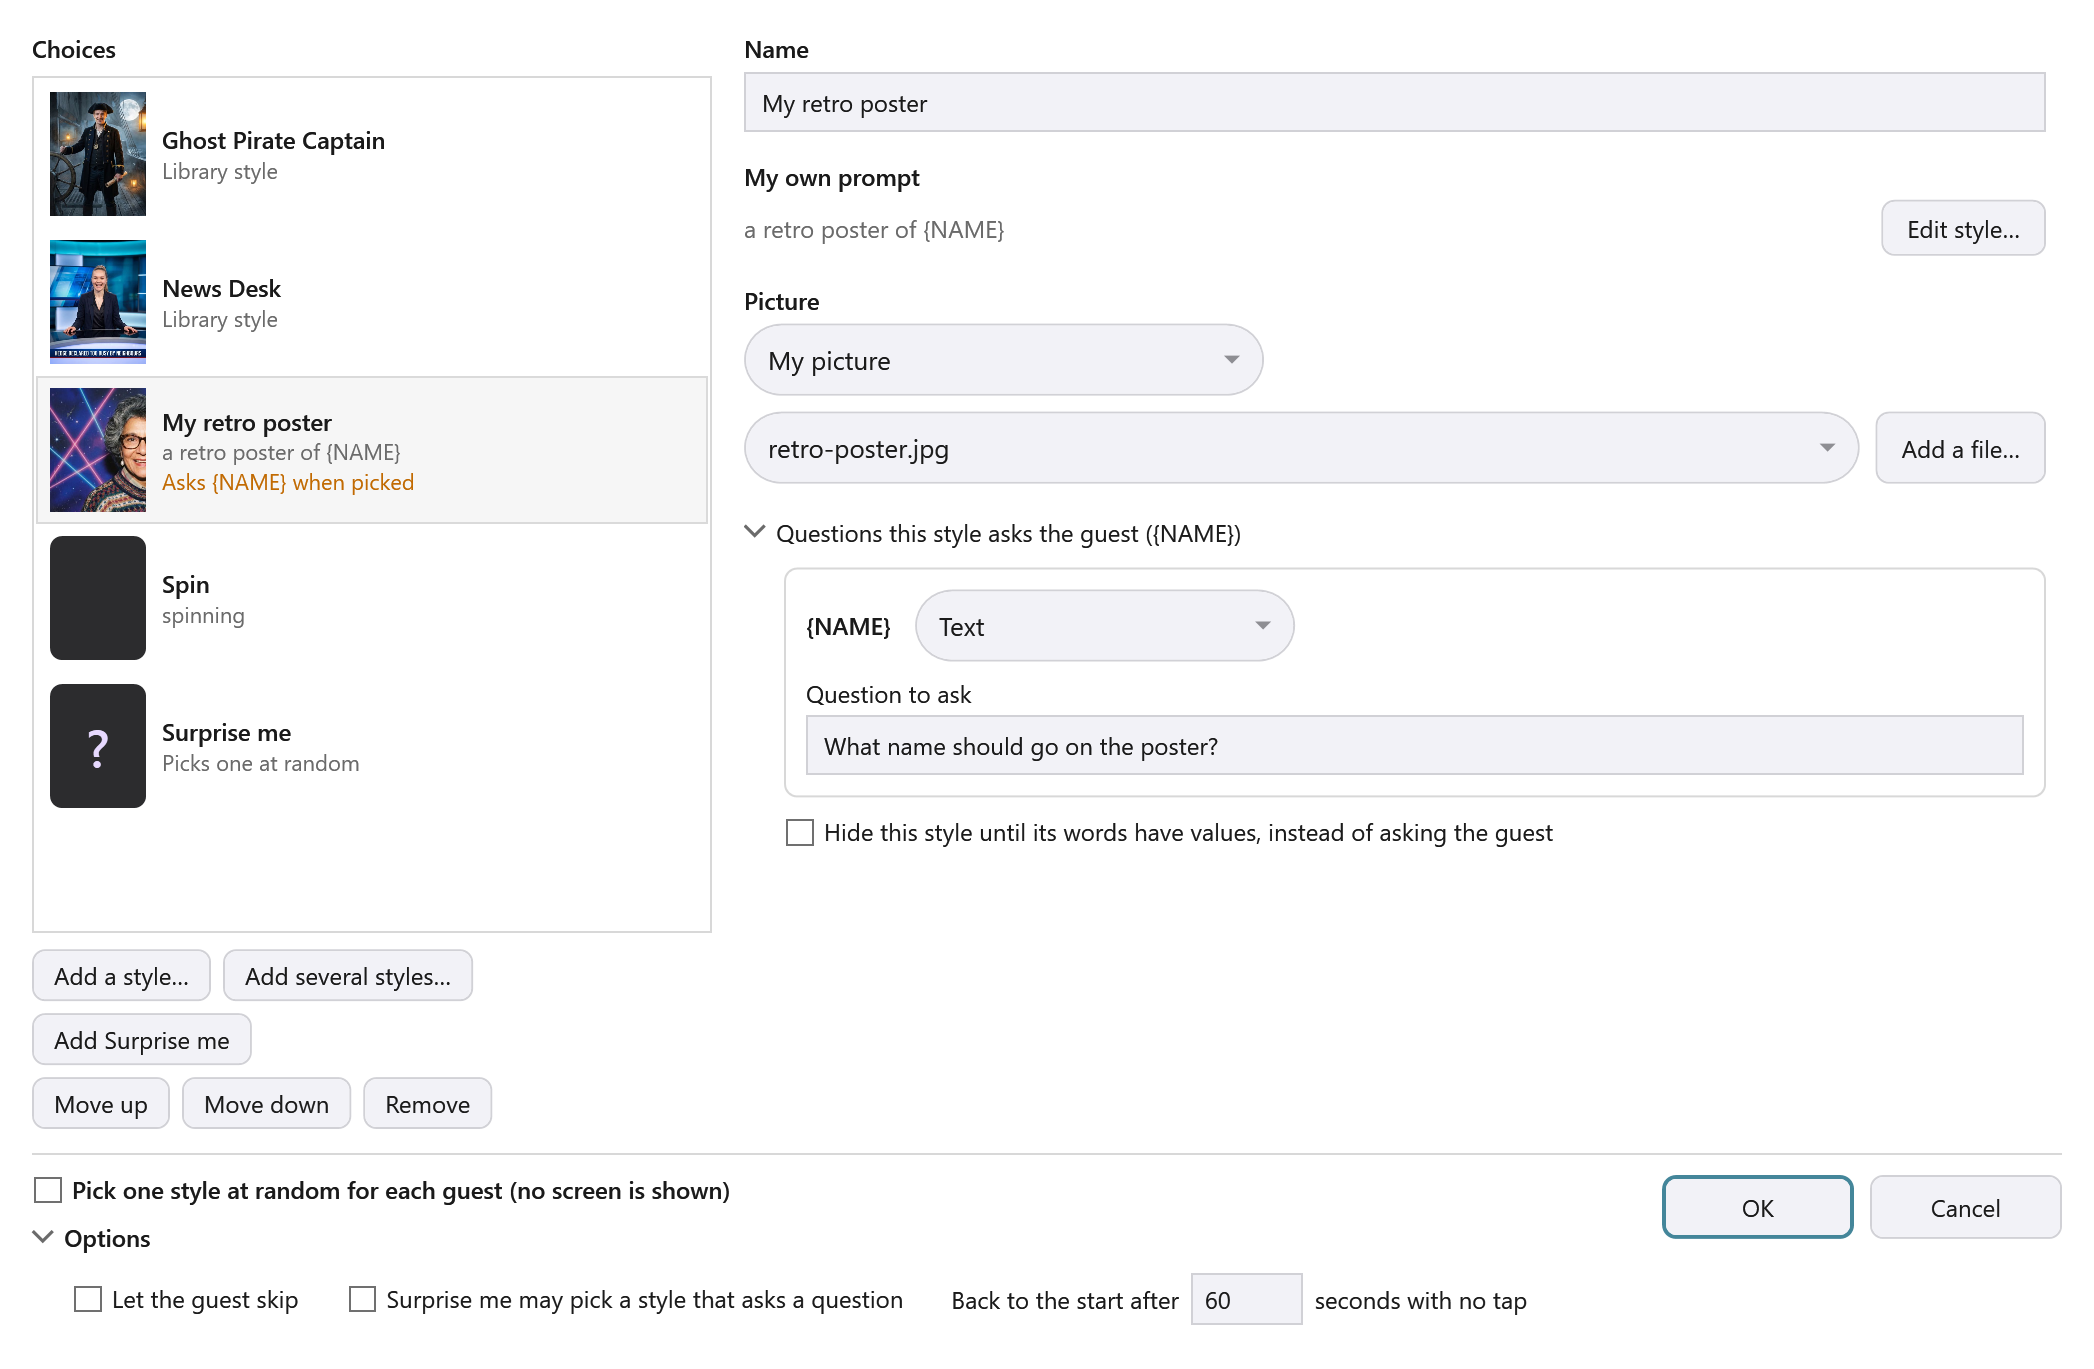
Open Questions this style asks the guest to choose how each word is asked:
-
Choose how the guest answers: Text (the short on-screen keyboard), Text (full keyboard), Number (a keypad, with a Smallest number and Largest number), Email, or Multiple choice with 2 to 8 Answers, one per line.
-
Type the Question to ask.
To keep a style off the screen until its words have values, rather than asking the guest, tick Hide this style until its words have values, instead of asking the guest.
Nothing is sent to the AI while a word the style needs has no value: the guest gets their photo as it was taken. A guest’s email address is never sent to the AI. See Using a Guest’s Name in Prints, Messages and AI Prompts.
Options
Open Options at the bottom of the window:
| Option | What it does |
|---|---|
| Let the guest skip | Shows a Skip button. A guest who skips gets the Photo step’s own style. |
| Surprise me may pick a style that asks a question | Shown when your list has a Surprise me. Left off, Surprise me only picks styles that need no answer from the guest. |
| Back to the start after … seconds with no tap | How long the screen waits for a tap before going back to the start. 0 means it never does. |
Press OK to keep your choices.
Tip: Taking the step to another booth
When you export the workflow, your own tile pictures and animations go with it. If the other PC already has a different picture with the same name, the new one is kept beside it with (2) added to its name. See Exporting and Importing Workflows.
This guide is from Booth Junkie, photo booth software for Windows that has supplied the photo booth industry for 10 years. It runs enclosed booths, selfie pods and magic mirror booths with a Canon DSLR or a webcam, prints to any Windows printer, and sends photos to guests by WhatsApp, SMS and email.