
Where to find it
Go to Admin Panel → Options → Print Settings. Single Shot, Multi Shot and Strip Print each have a Calibrate… button, on the right of that shot type’s Reverse orientation / Rotate 90° before print row.
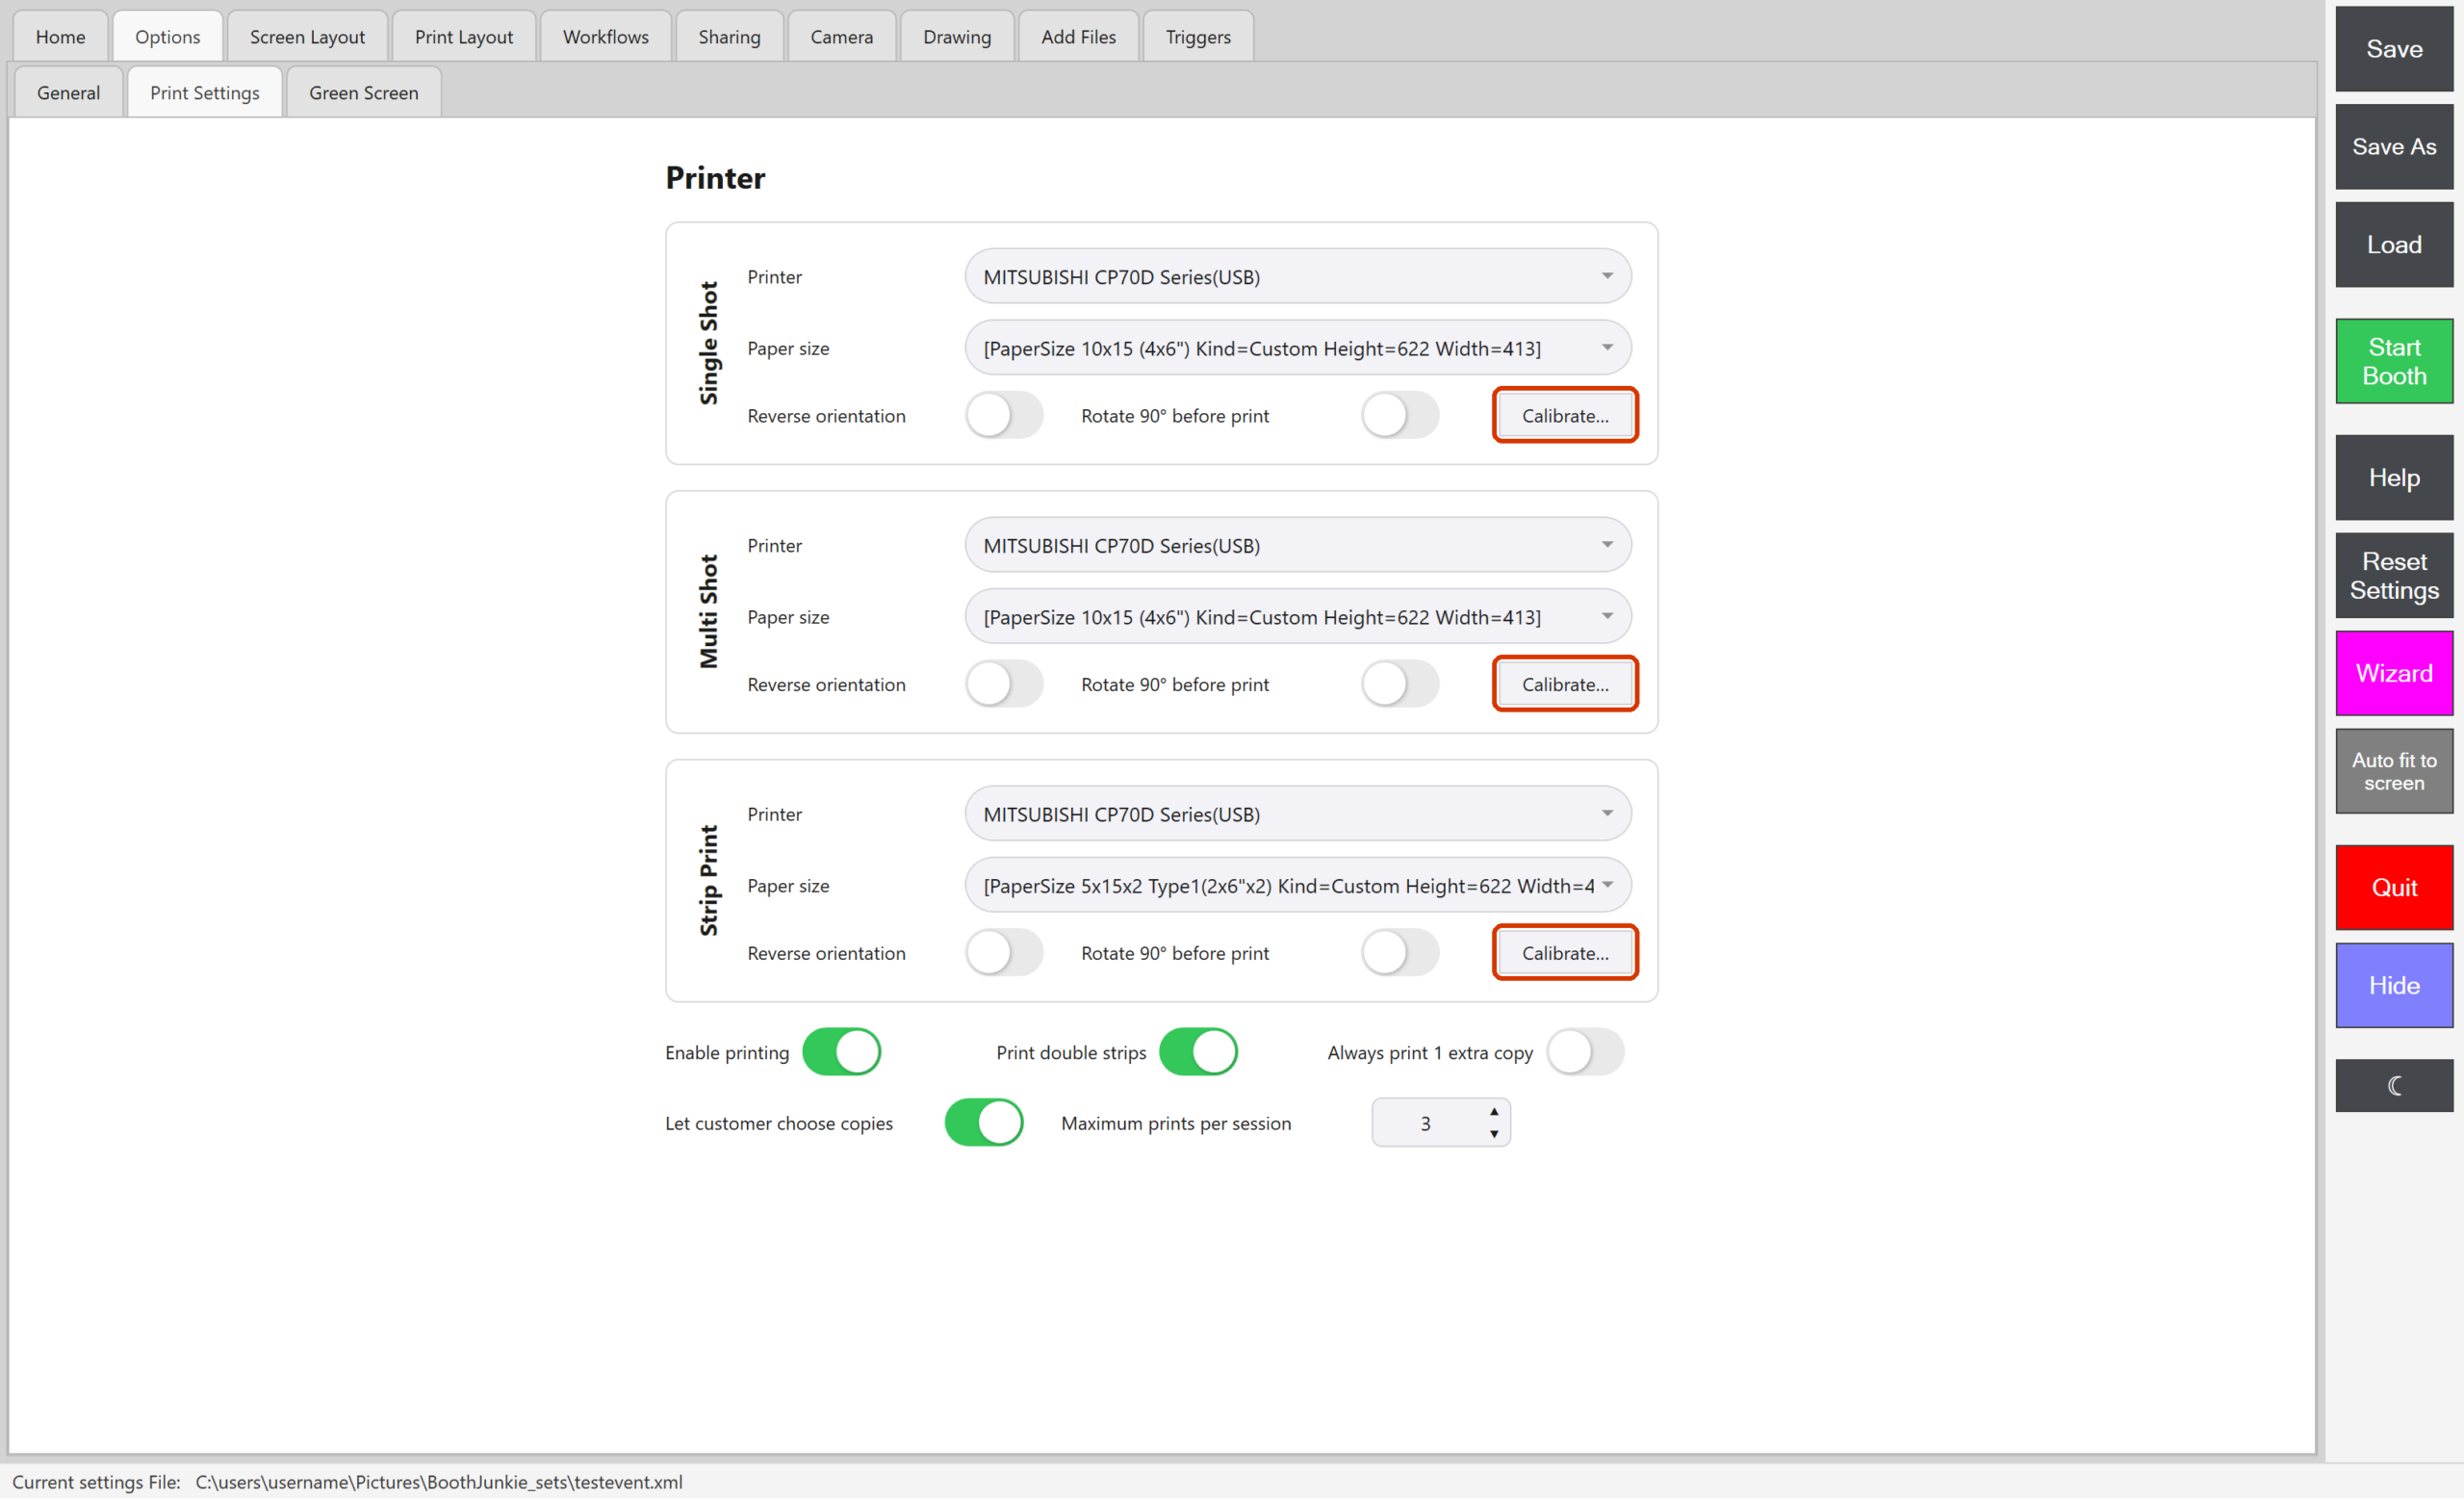
Each shot type is calibrated separately, because each can go to a different printer, on different paper.
The calibration window
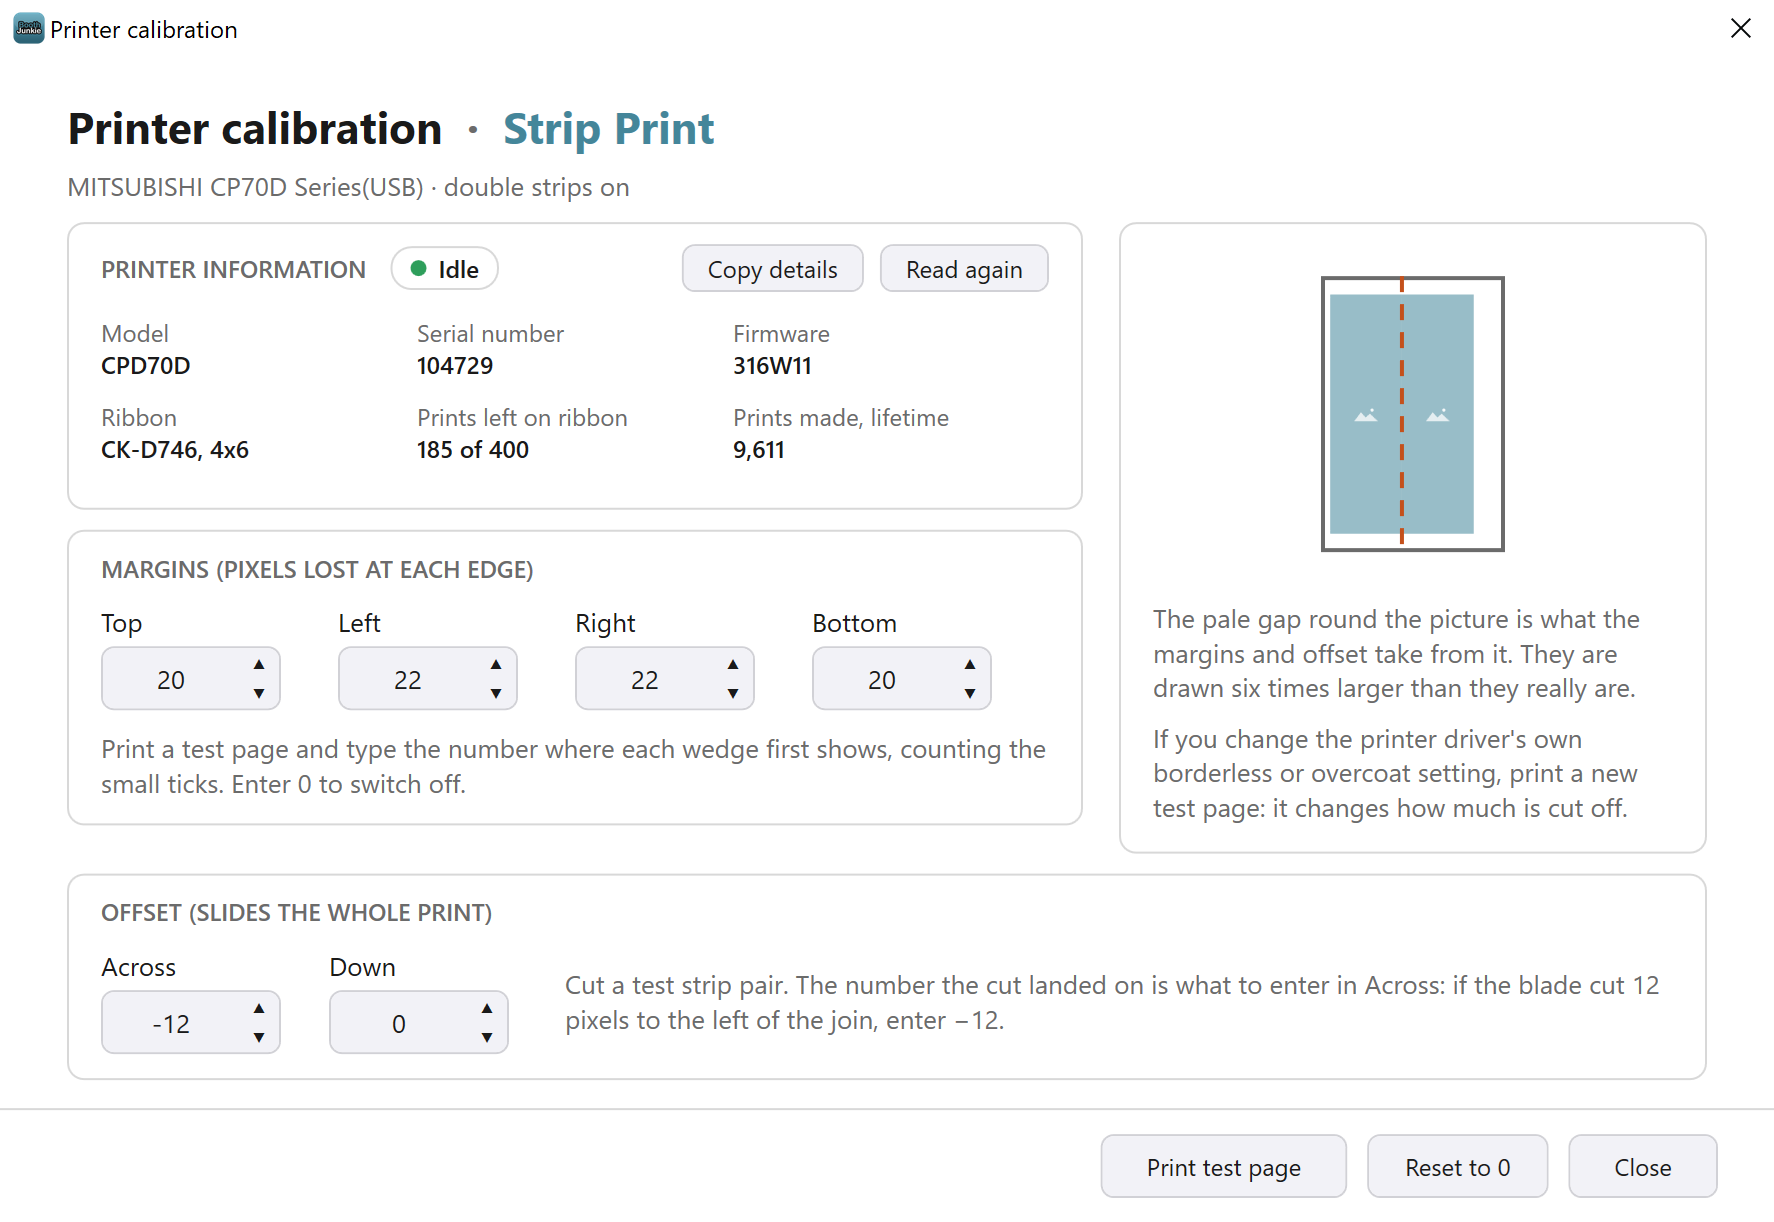
The window is titled Printer calibration · Single Shot (or Multi Shot, or Strip Print). The line under the title names the printer, and says “double strips on” for a strip pair.
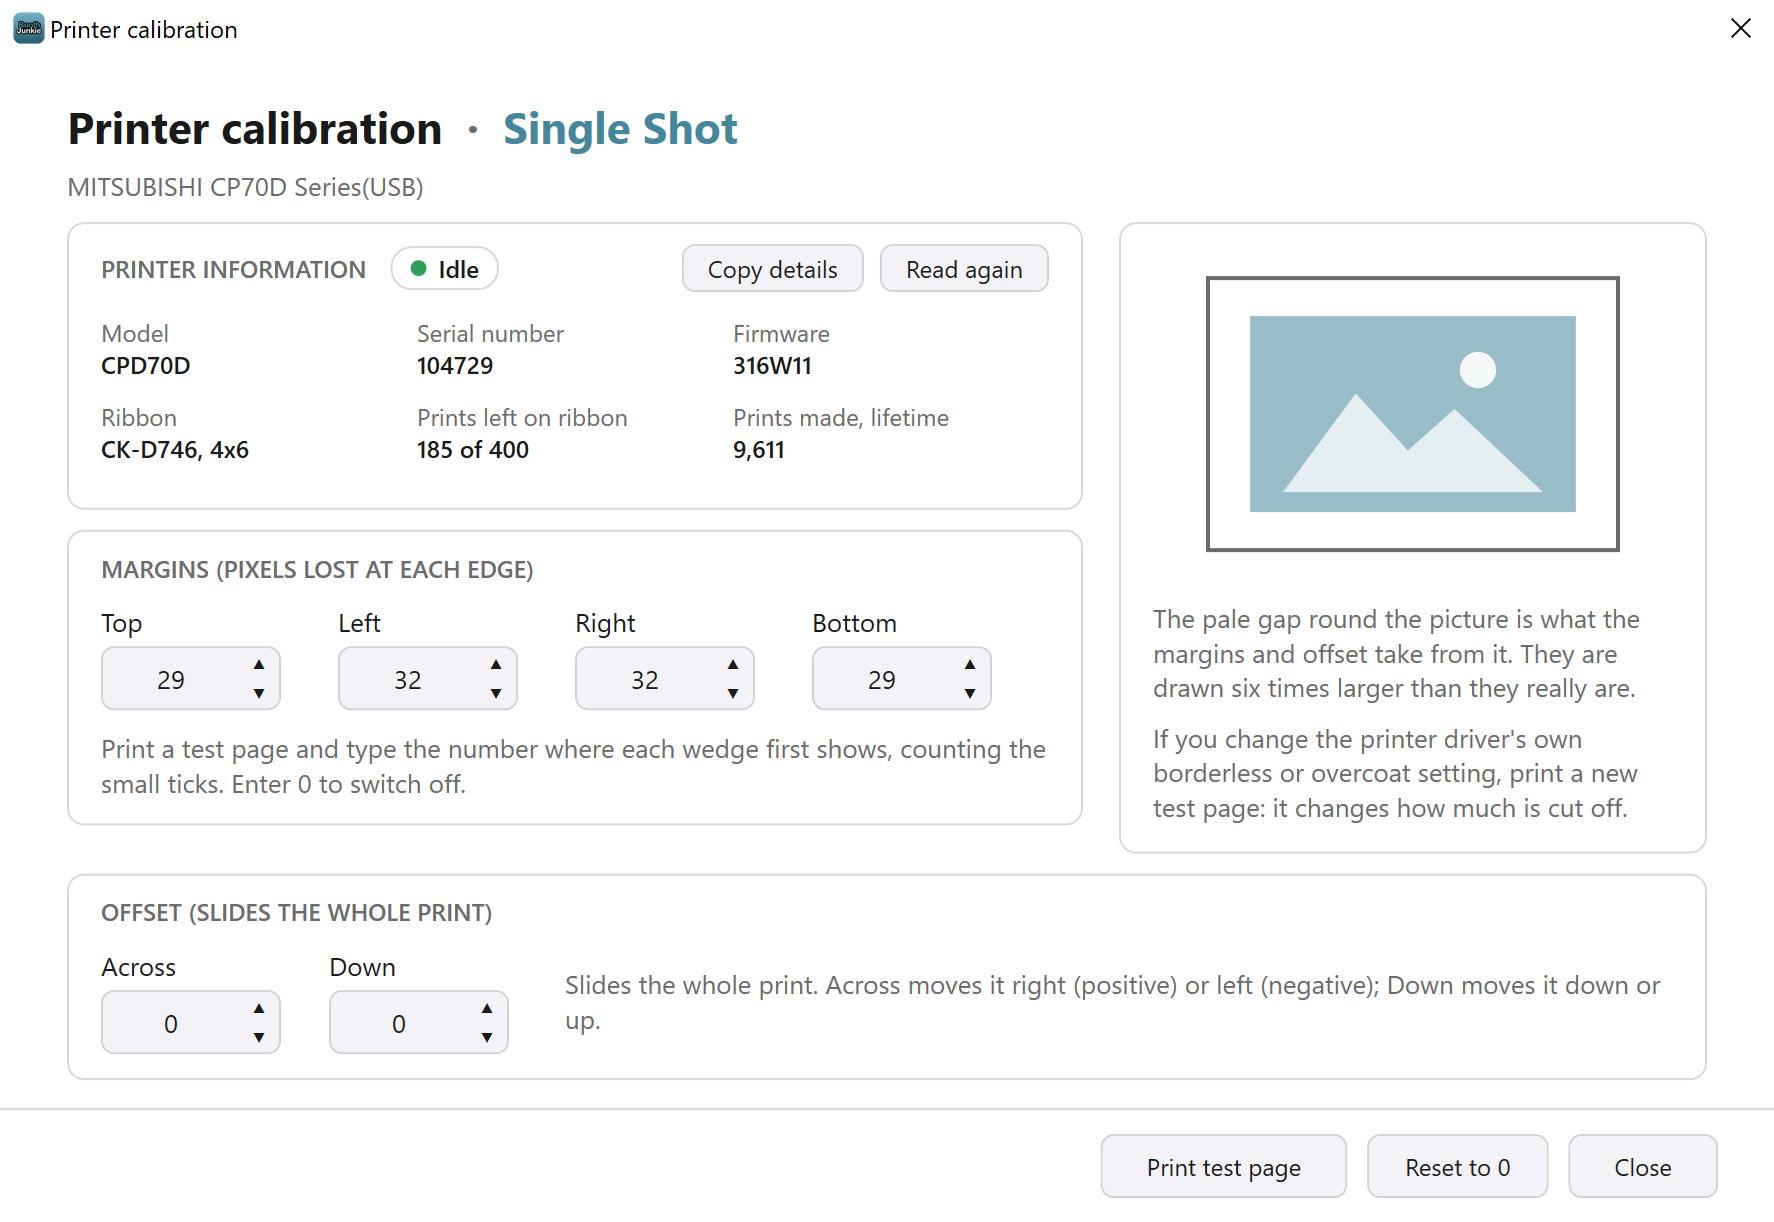
| Part | What it does |
|---|---|
| Margins (pixels lost at each edge): Top, Left, Right, Bottom | How many pixels the printer cuts off at each edge. The picture is drawn that many pixels inside the sheet, so nothing important is lost. A negative number draws the picture beyond the sheet, for a printer that leaves a white border. |
| Offset (slides the whole print): Across, Down | Slides the whole print. Across moves it right (positive) or left (negative); Down moves it down (positive) or up (negative). |
| The sketch | Shows where the picture lands on the sheet. The pale gap round the picture is what the margins and offset take from it; they’re drawn six times larger than they really are. At 0, the picture fills the whole sheet, edge to edge. |
| Print test page | Prints one test sheet for this shot type. It asks first, because it’s a real print. |
| Reset to 0 | Puts every number back to 0. |
| Close | Closes the window. |
All six are whole numbers, from -300 to 300, in print-layout pixels: the pixels of the layout you design on the Print Layout tab. The layout is 1800 pixels on its long edge, which is 6 inches at 300 dpi: 1800 × 1200 for a landscape Single Shot or Multi Shot, 1200 × 1800 for a portrait one, and 600 × 1800 for a portrait strip (1800 × 600 for a landscape one).
Good to know: Saved as you type
Every number is saved as it changes. Press Save as usual to keep it in your settings file.
Printer information
For many Mitsubishi, DNP, Citizen and HiTi printers, a PRINTER INFORMATION card at the top left of the window shows what the printer itself reports. It reads the printer chosen for that shot type on the Print Settings tab:
- the model, serial number and firmware;
- the ribbon or media roll loaded;
- the prints left on it, in orange when it’s nearly used up;
- the prints the printer has made;
- its status, or any fault it reports.
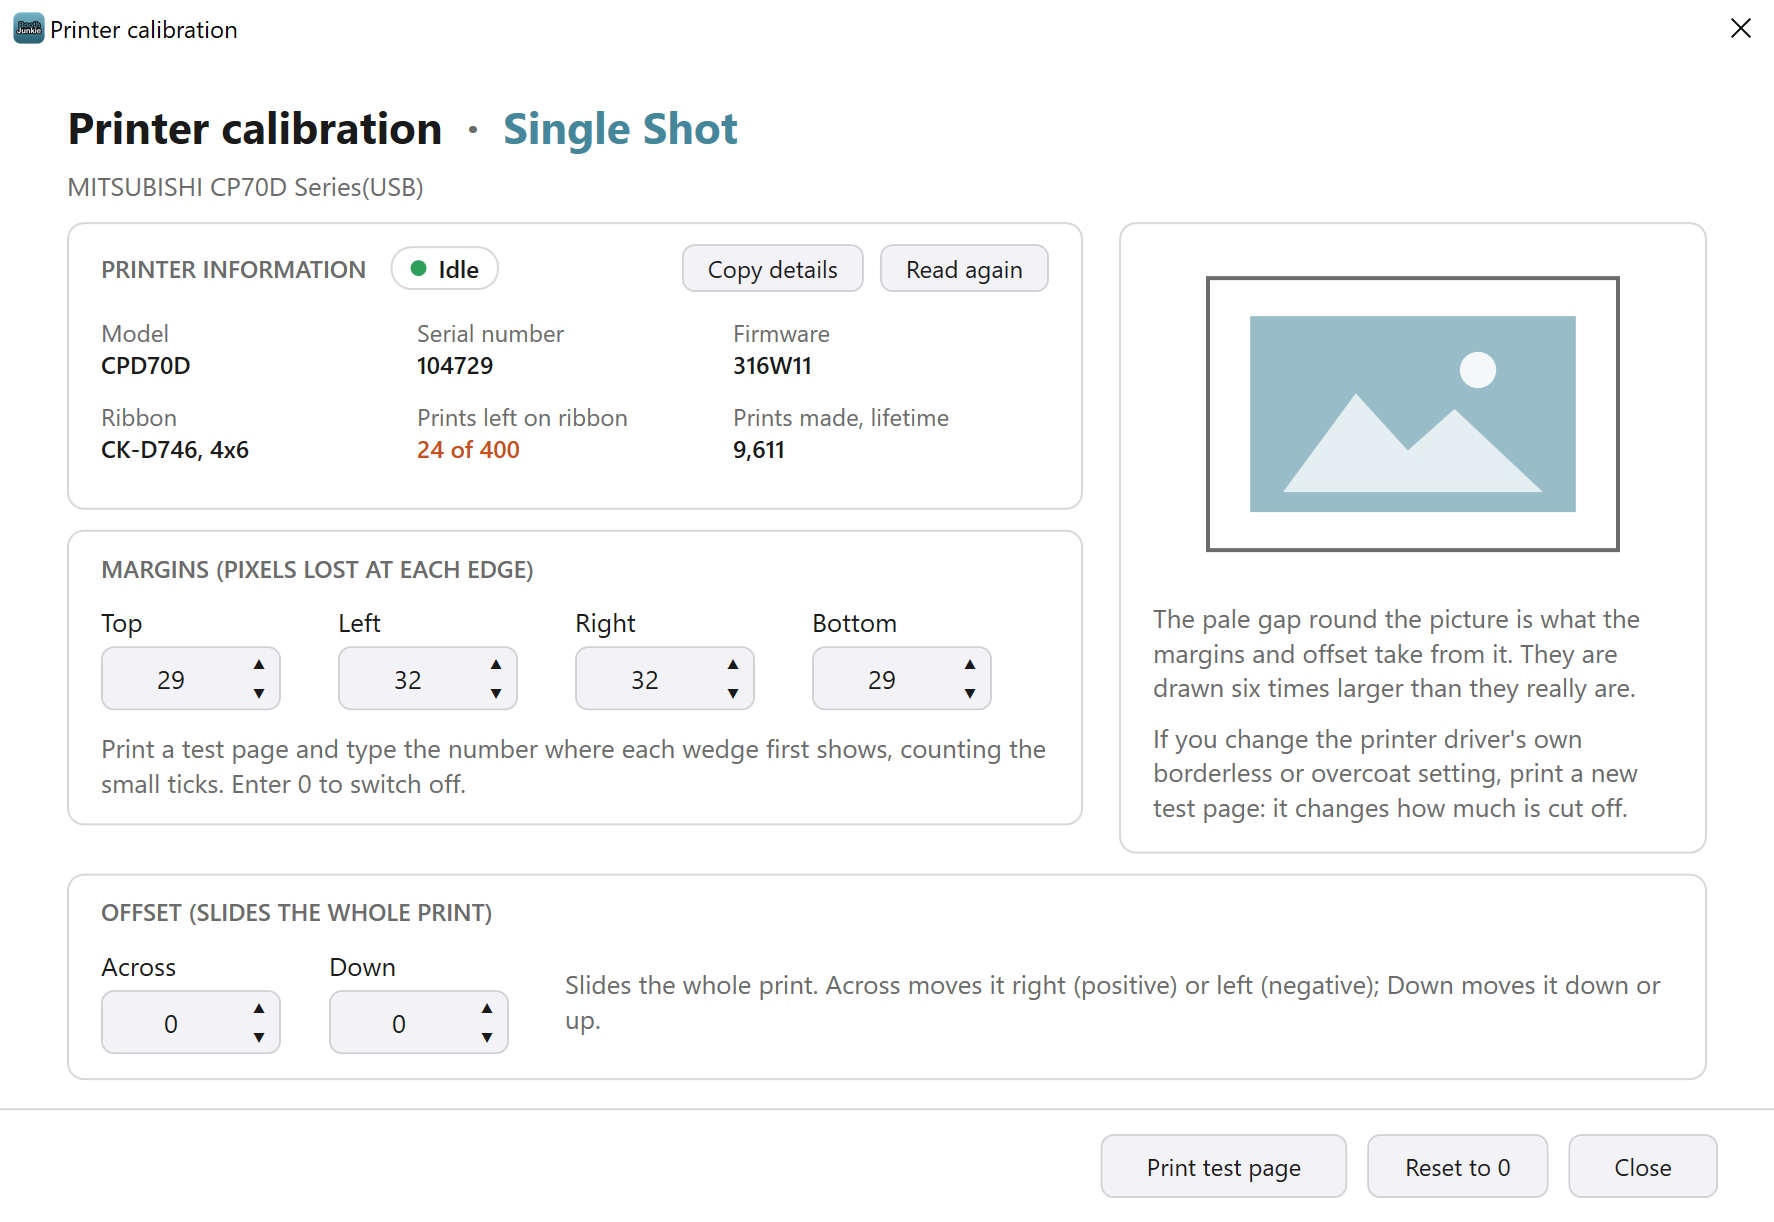
Press Read again to ask the printer again, for example after changing the ribbon. The card only asks questions: it never prints, changes or resets anything on the printer, and it asks nothing while a print is waiting or being sent.
| Button | What it does |
|---|---|
| Read again | Asks the printer again. |
| Copy details | Copies everything the printer sent back, so you can paste it into an email to Booth Junkie support if a figure looks wrong. |
Most models are read from their maker’s published information, and the card says so in a note. If something on the card doesn’t match the printer, Copy details helps us put it right.
When the printer can’t be read, the card says why instead. The usual reasons are:
- the printer isn’t plugged into this PC by USB, or isn’t switched on;
- the printer queue chosen is a virtual one, or a printer shared from another PC;
- the printer is busy;
- the model isn’t one Booth Junkie can read.
Other makes of printer get no card. Calibration works the same with or without it.
The test page
The test page is a white page, with its wedges and scales in Booth Junkie teal. It shows the logo, the shot type, printer, paper and layout, the margins and offset set now, and a short reminder of what to do.
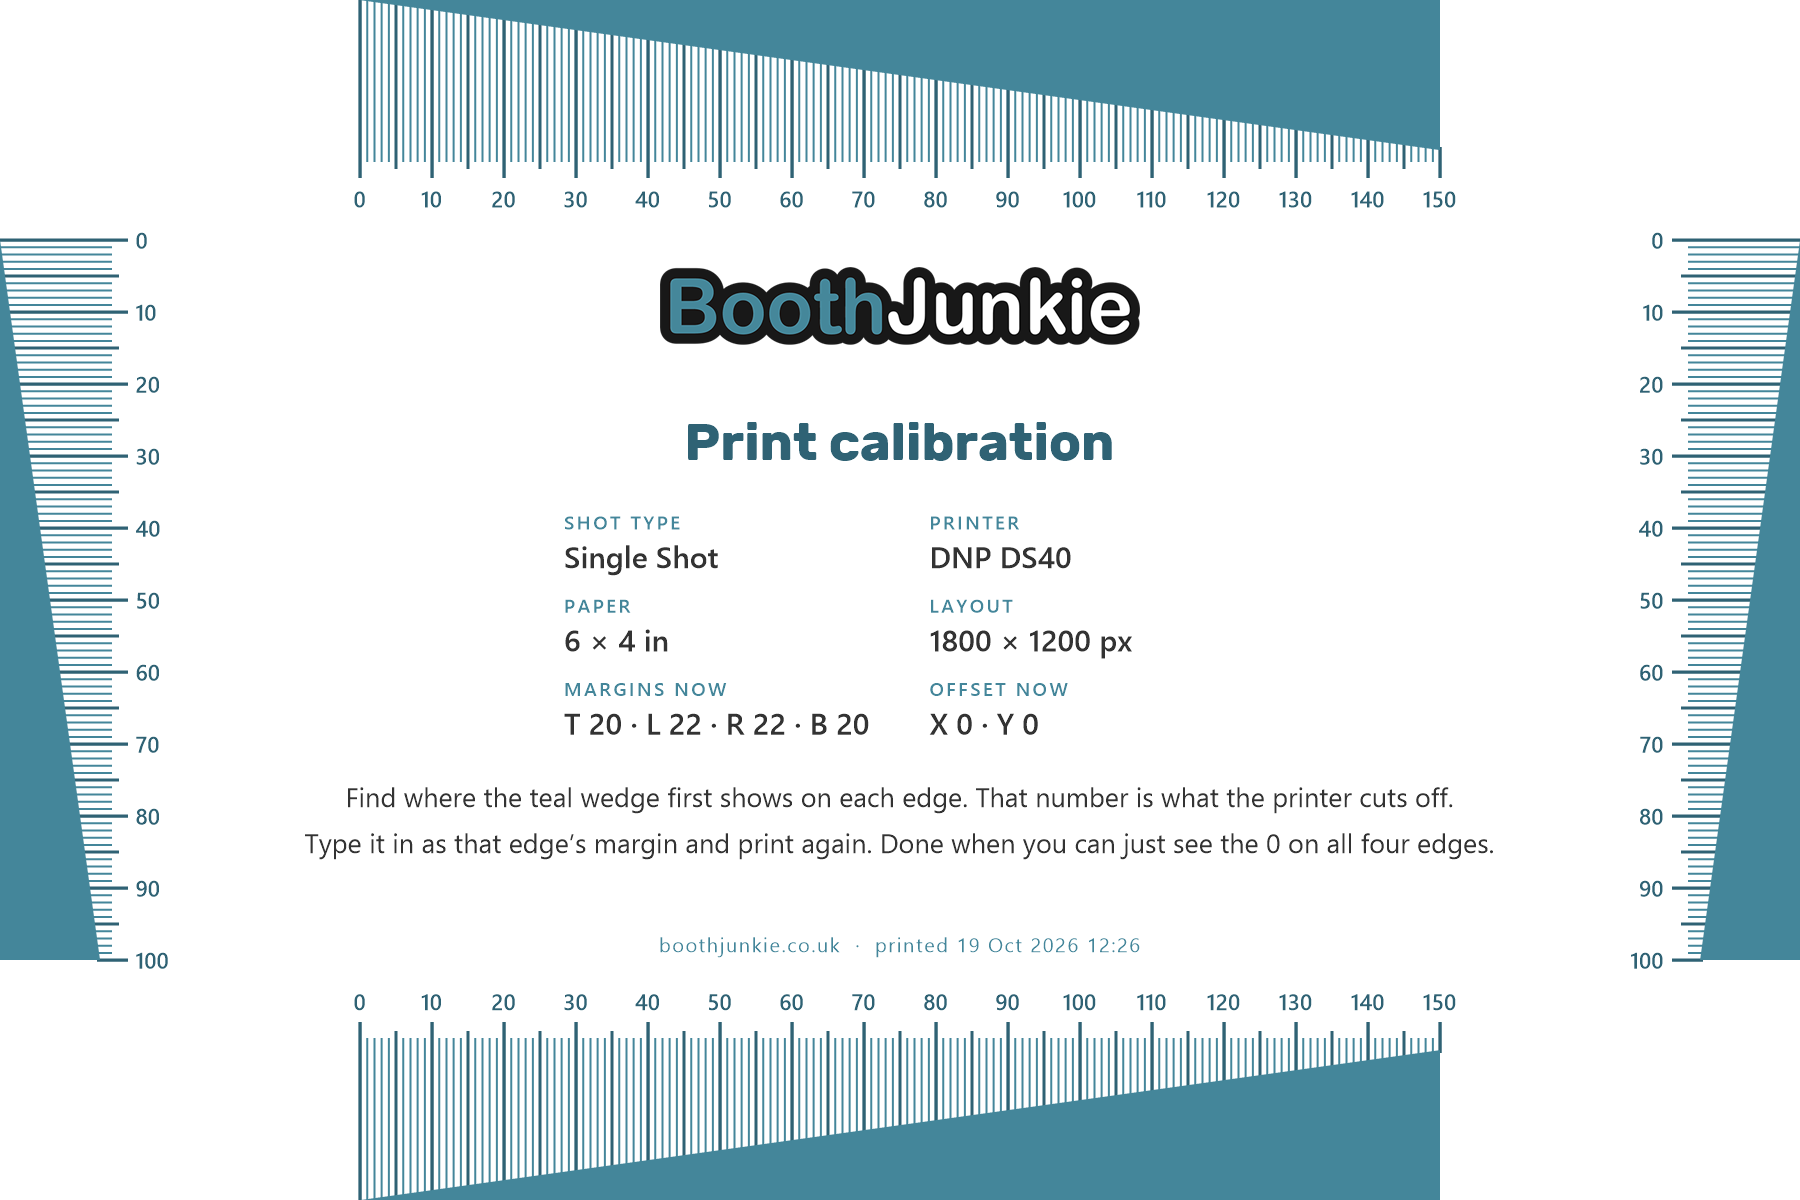
On each edge there’s a teal wedge with a scale beside it: a small tick for every pixel, a heavier one every 5, and the heaviest, numbered, every 10.
It’s printed through exactly the same printer, paper, orientation and settings as a real print, so it also shows the margins and offset already set. It’s never what Reprint Last Photo reprints.
Calibrate the margins
-
Press Calibrate… for the shot type, then Print test page, and confirm.
The test page goes to the printer chosen for that shot type, with the paper and orientation set on the Print Settings tab.
-
On each edge of the printed page, find where the teal wedge first shows, counting the small ticks.
Result: That number is how many pixels the printer cuts off at that edge.
-
Type each edge’s number into its box under Margins: Top, Left, Right and Bottom.
-
Print the test page again.
Result: The 0 mark should now just show on all four edges.
Tip: Changed the printer driver?
If you change the printer driver’s own borderless or overcoat setting, print a new test page: it changes how much is cut off.
Calibrate a strip pair’s cut
When Print double strips is on, two strips print side by side on one sheet and the printer cuts them apart. If the cut doesn’t land on the join between them, use Across to move it.
Good to know: Mitsubishi strip printers
A Mitsubishi printer prints strips two to a sheet, on its Type 1 paper. If a Mitsubishi printer is chosen for Strip Print with any other paper, or with Print double strips off, the calibration window tells you what to change on the Print Settings tab before you calibrate the strips.
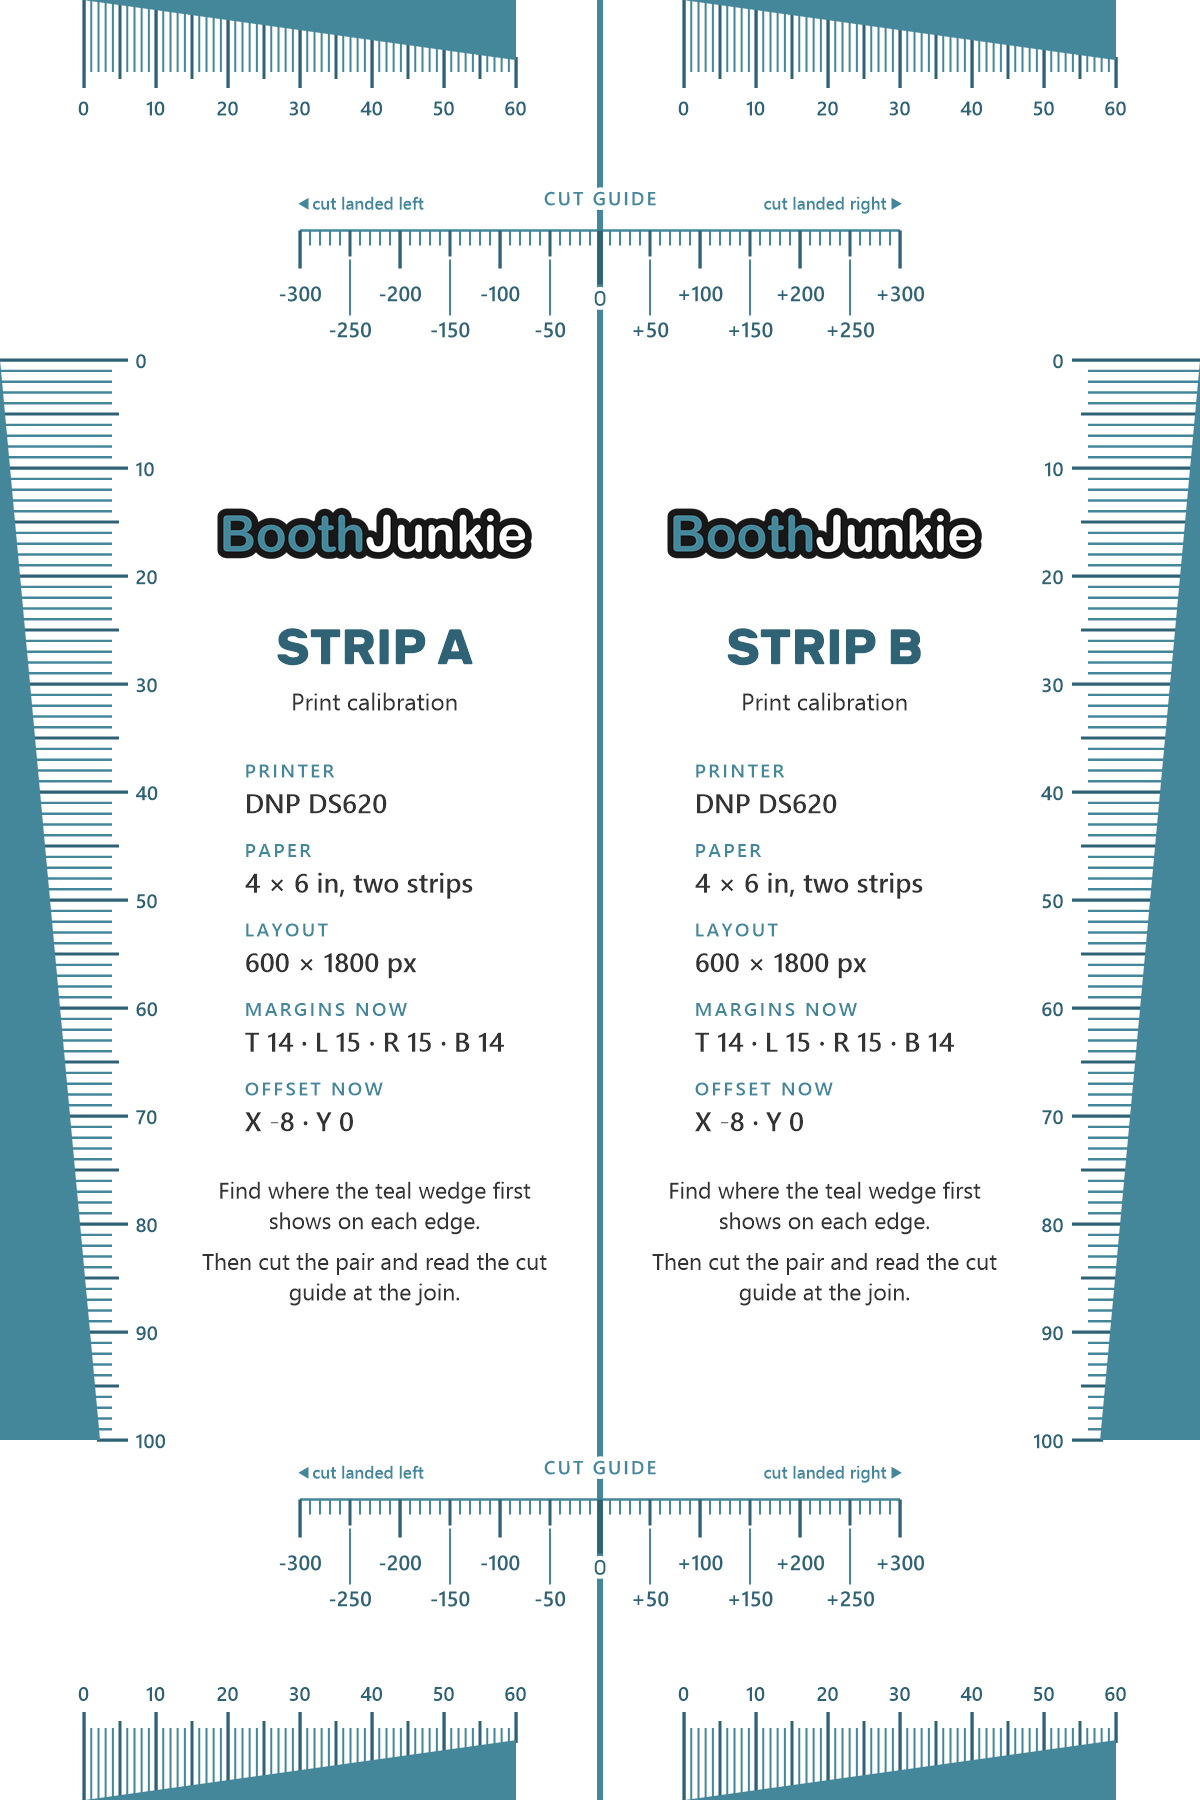
The strip pair’s test page has a teal line along the join, and a cut guide across it at the top and bottom, running from -300 to +300.
-
Press Calibrate… for Strip Print, then Print test page, and confirm.
Set the margins first, from the wedges, exactly as above.
-
Let the printer cut the pair, and read the number on the cut guide where the cut landed.
On the cut guide, a small tick is 10 pixels (about 0.85 mm), a heavier one every 50 and the heaviest every 100, with a number every 50. Read to the nearest tick, and judge the part-way by eye.
-
Type that number in Across. A cut that landed left of the join is a negative number: if the blade cut 12 pixels to the left of the join, enter -12.
-
Print and cut the test pair again to check.
The guide is at true scale, so the number the cut lands on is exactly the number to type in. However much the margins change, the join stays at the middle of the sheet plus the Across offset: the margins only move the outer edges and the top and bottom.
Good to know: Strips printed one above the other
With a landscape strip layout, the two strips are printed one above the other, so the join runs across the sheet. Use Down instead of Across: if the blade cut 12 pixels above the join, enter -12.
Good to know
- With Rotate 90° before print on, the numbers are in the turned picture’s pixels, as it lands on the paper. The window says so.
- Leaving everything at 0 prints exactly as before calibration existed.
Related articles
- The Print Settings Tab: Printers, Paper Sizes, and Printing Rules
- Building a Print Layout Template
- Strip Print Layouts
This guide is from Booth Junkie, photo booth software for Windows that has supplied the photo booth industry for 10 years. It runs enclosed booths, selfie pods and magic mirror booths with a Canon DSLR or a webcam, prints to any Windows printer, and sends photos to guests by WhatsApp, SMS and email.