
How it works
The ring sits round the camera lens. When a workflow switches it on, it plays a moving pattern of light, in the colour and at the speed you chose, so guests look at the lens instead of the screen or each other.
It’s one unit that clips over the lens, with a single USB-C cable to the booth PC, which also powers it. It needs no other hardware, and it works with any licence: it doesn’t need an active Premium.
Each Light Ring comes with a user guide. The guide, and the Light Ring Programmer for changing the ring’s brightness, can be downloaded from the Animated LED Light Ring product page. You don’t need the Programmer to use the ring with Booth Junkie.
Connect it and check it’s found
-
Clip the ring over the camera lens, so the lens looks straight through it.
-
Connect the ring to the booth PC with its USB-C cable. You can do this before or after you open Booth Junkie, and any USB socket will do.
-
Go to Admin Panel → Options → General, and find the Light Ring light, beside the Keyfob light.
Result: The light says Detected, in green.
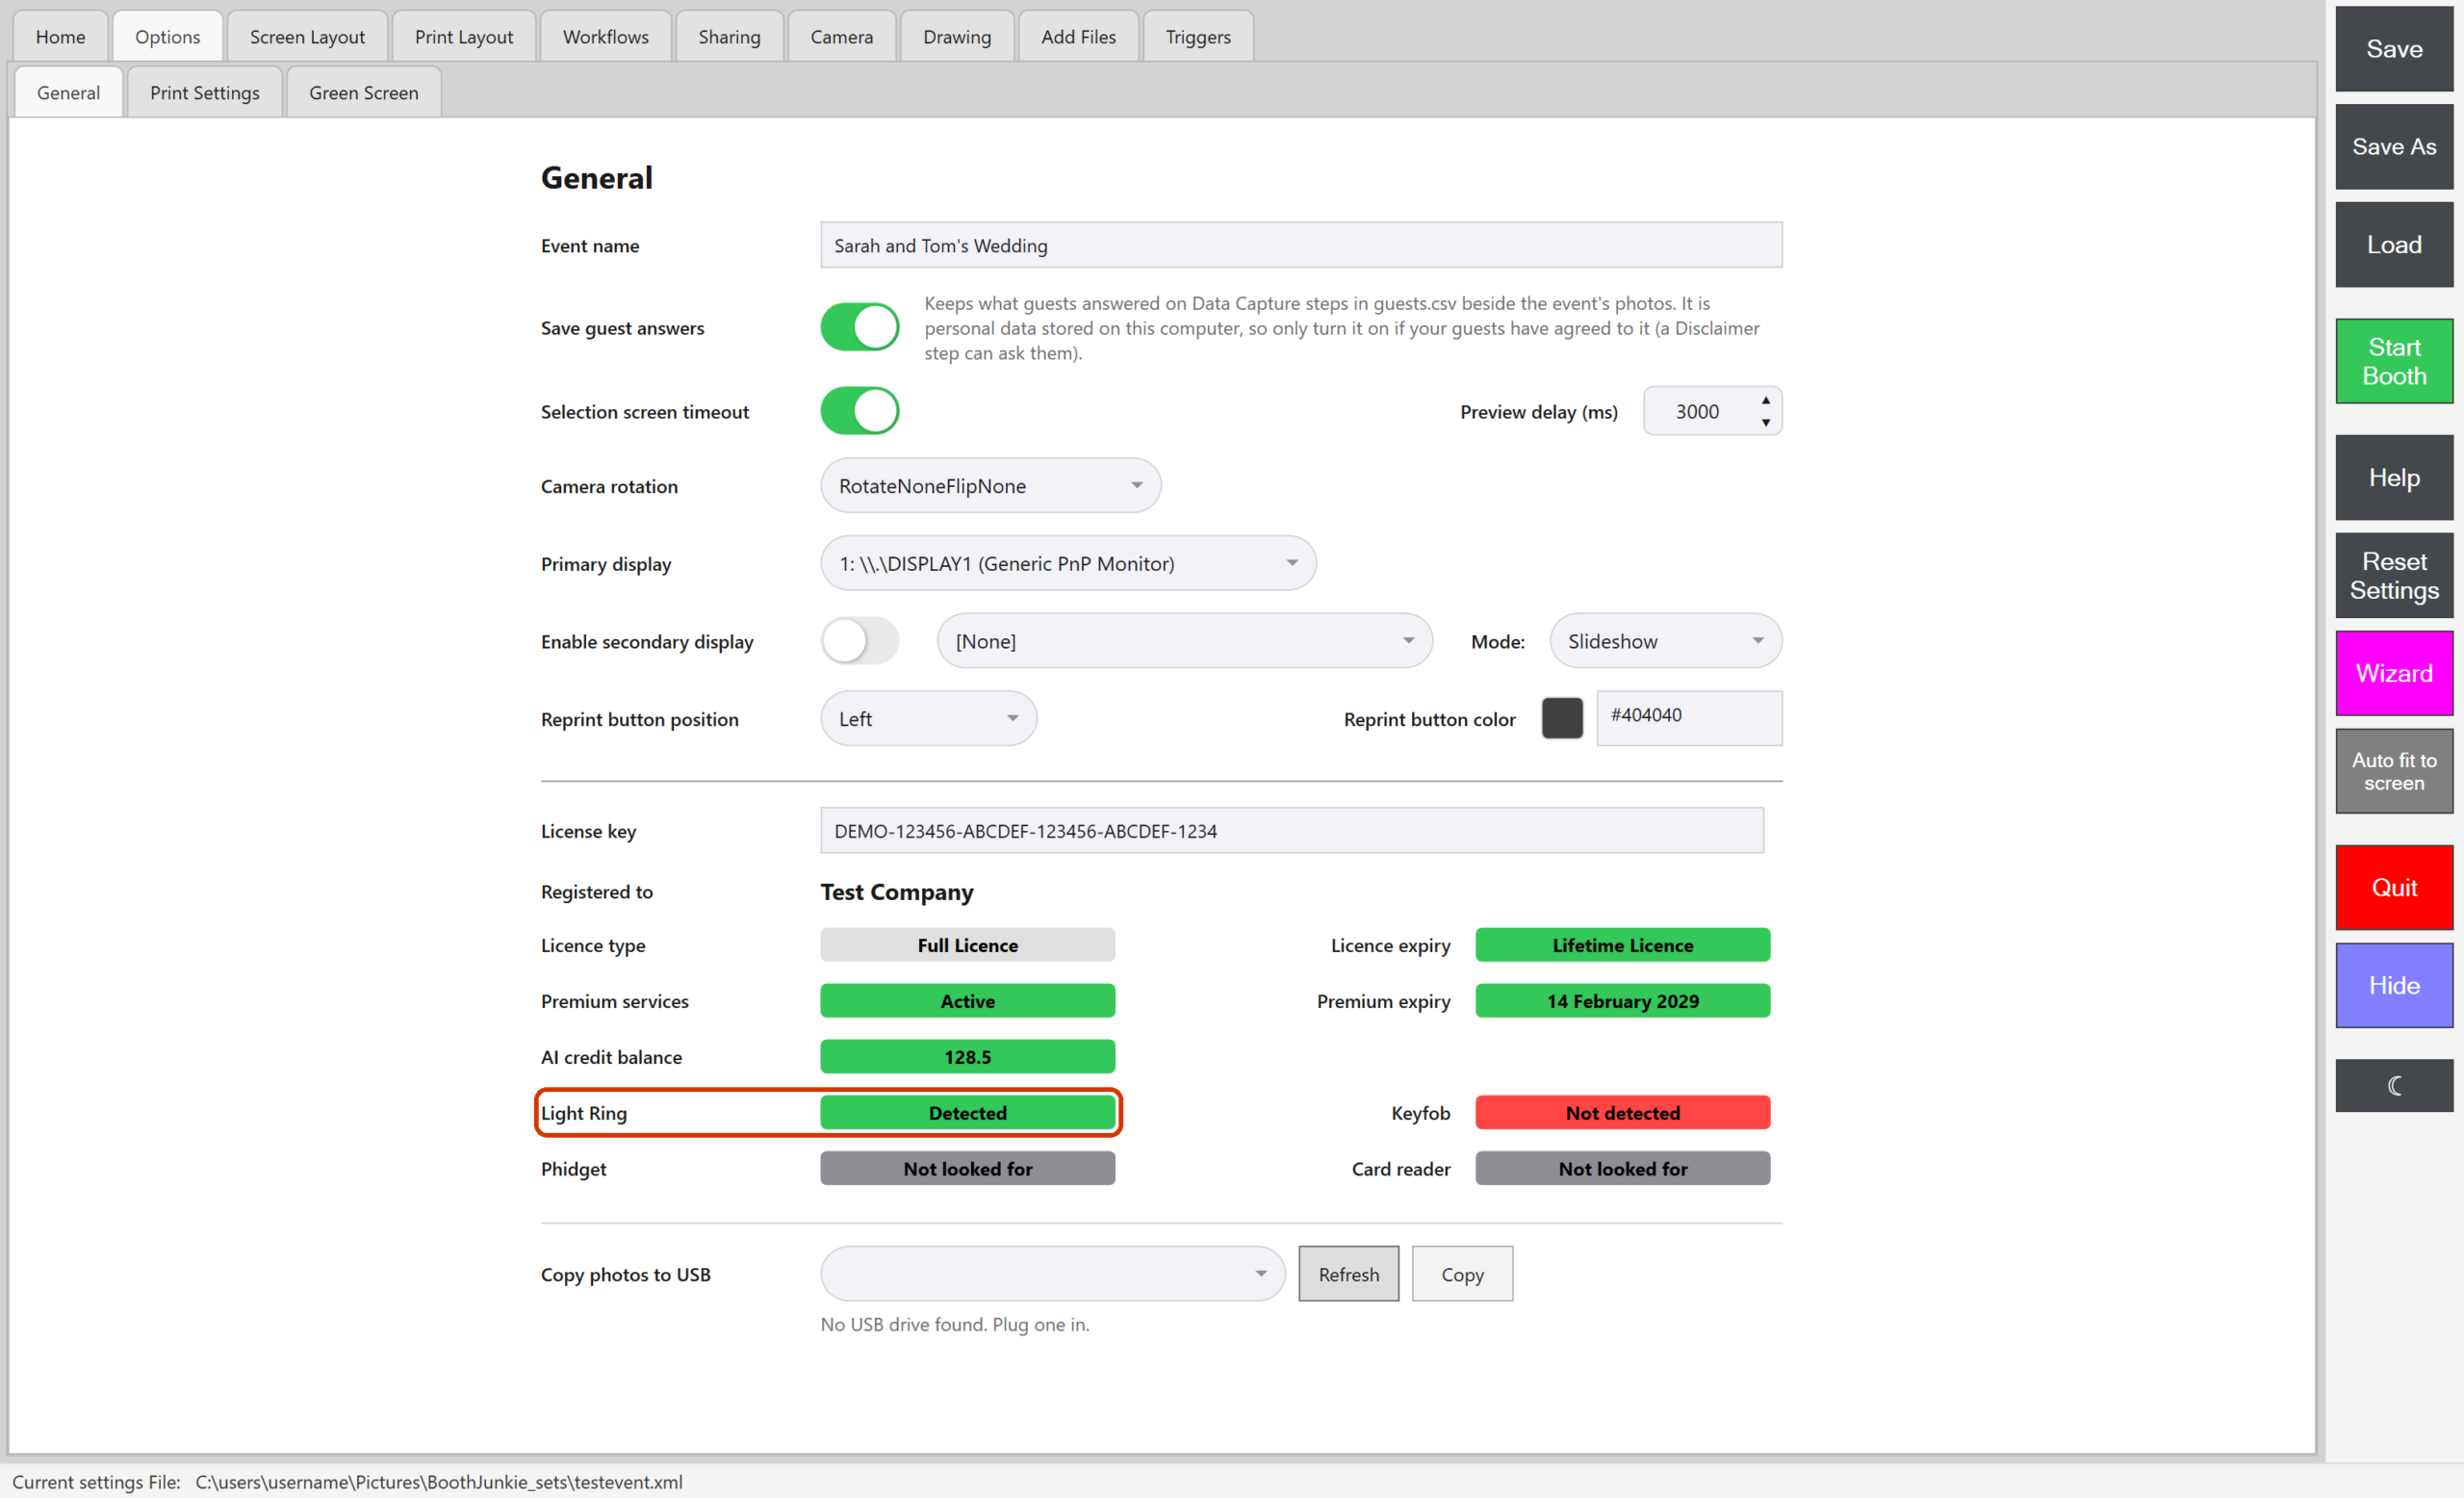
The details in this picture are examples. -
Click the green light to test the ring.
Result: The ring lights up for 3 seconds, using its last settings, then goes off.
If the light says Not detected, in red, click it: Booth Junkie looks for the ring again. If it stays red, unplug the cable, plug it back in and click the light again. For the rest of the tab, see The General Tab: Event Name, Rotation, and Licence Info.
On for the countdown, off for the photo
Switch the ring off before the photo is taken, so its light doesn’t reflect in the photo or tint the guests’ faces. A typical layout has a Light Ring On step before the countdown Animation, and a Light Ring Off step before the Photo step:
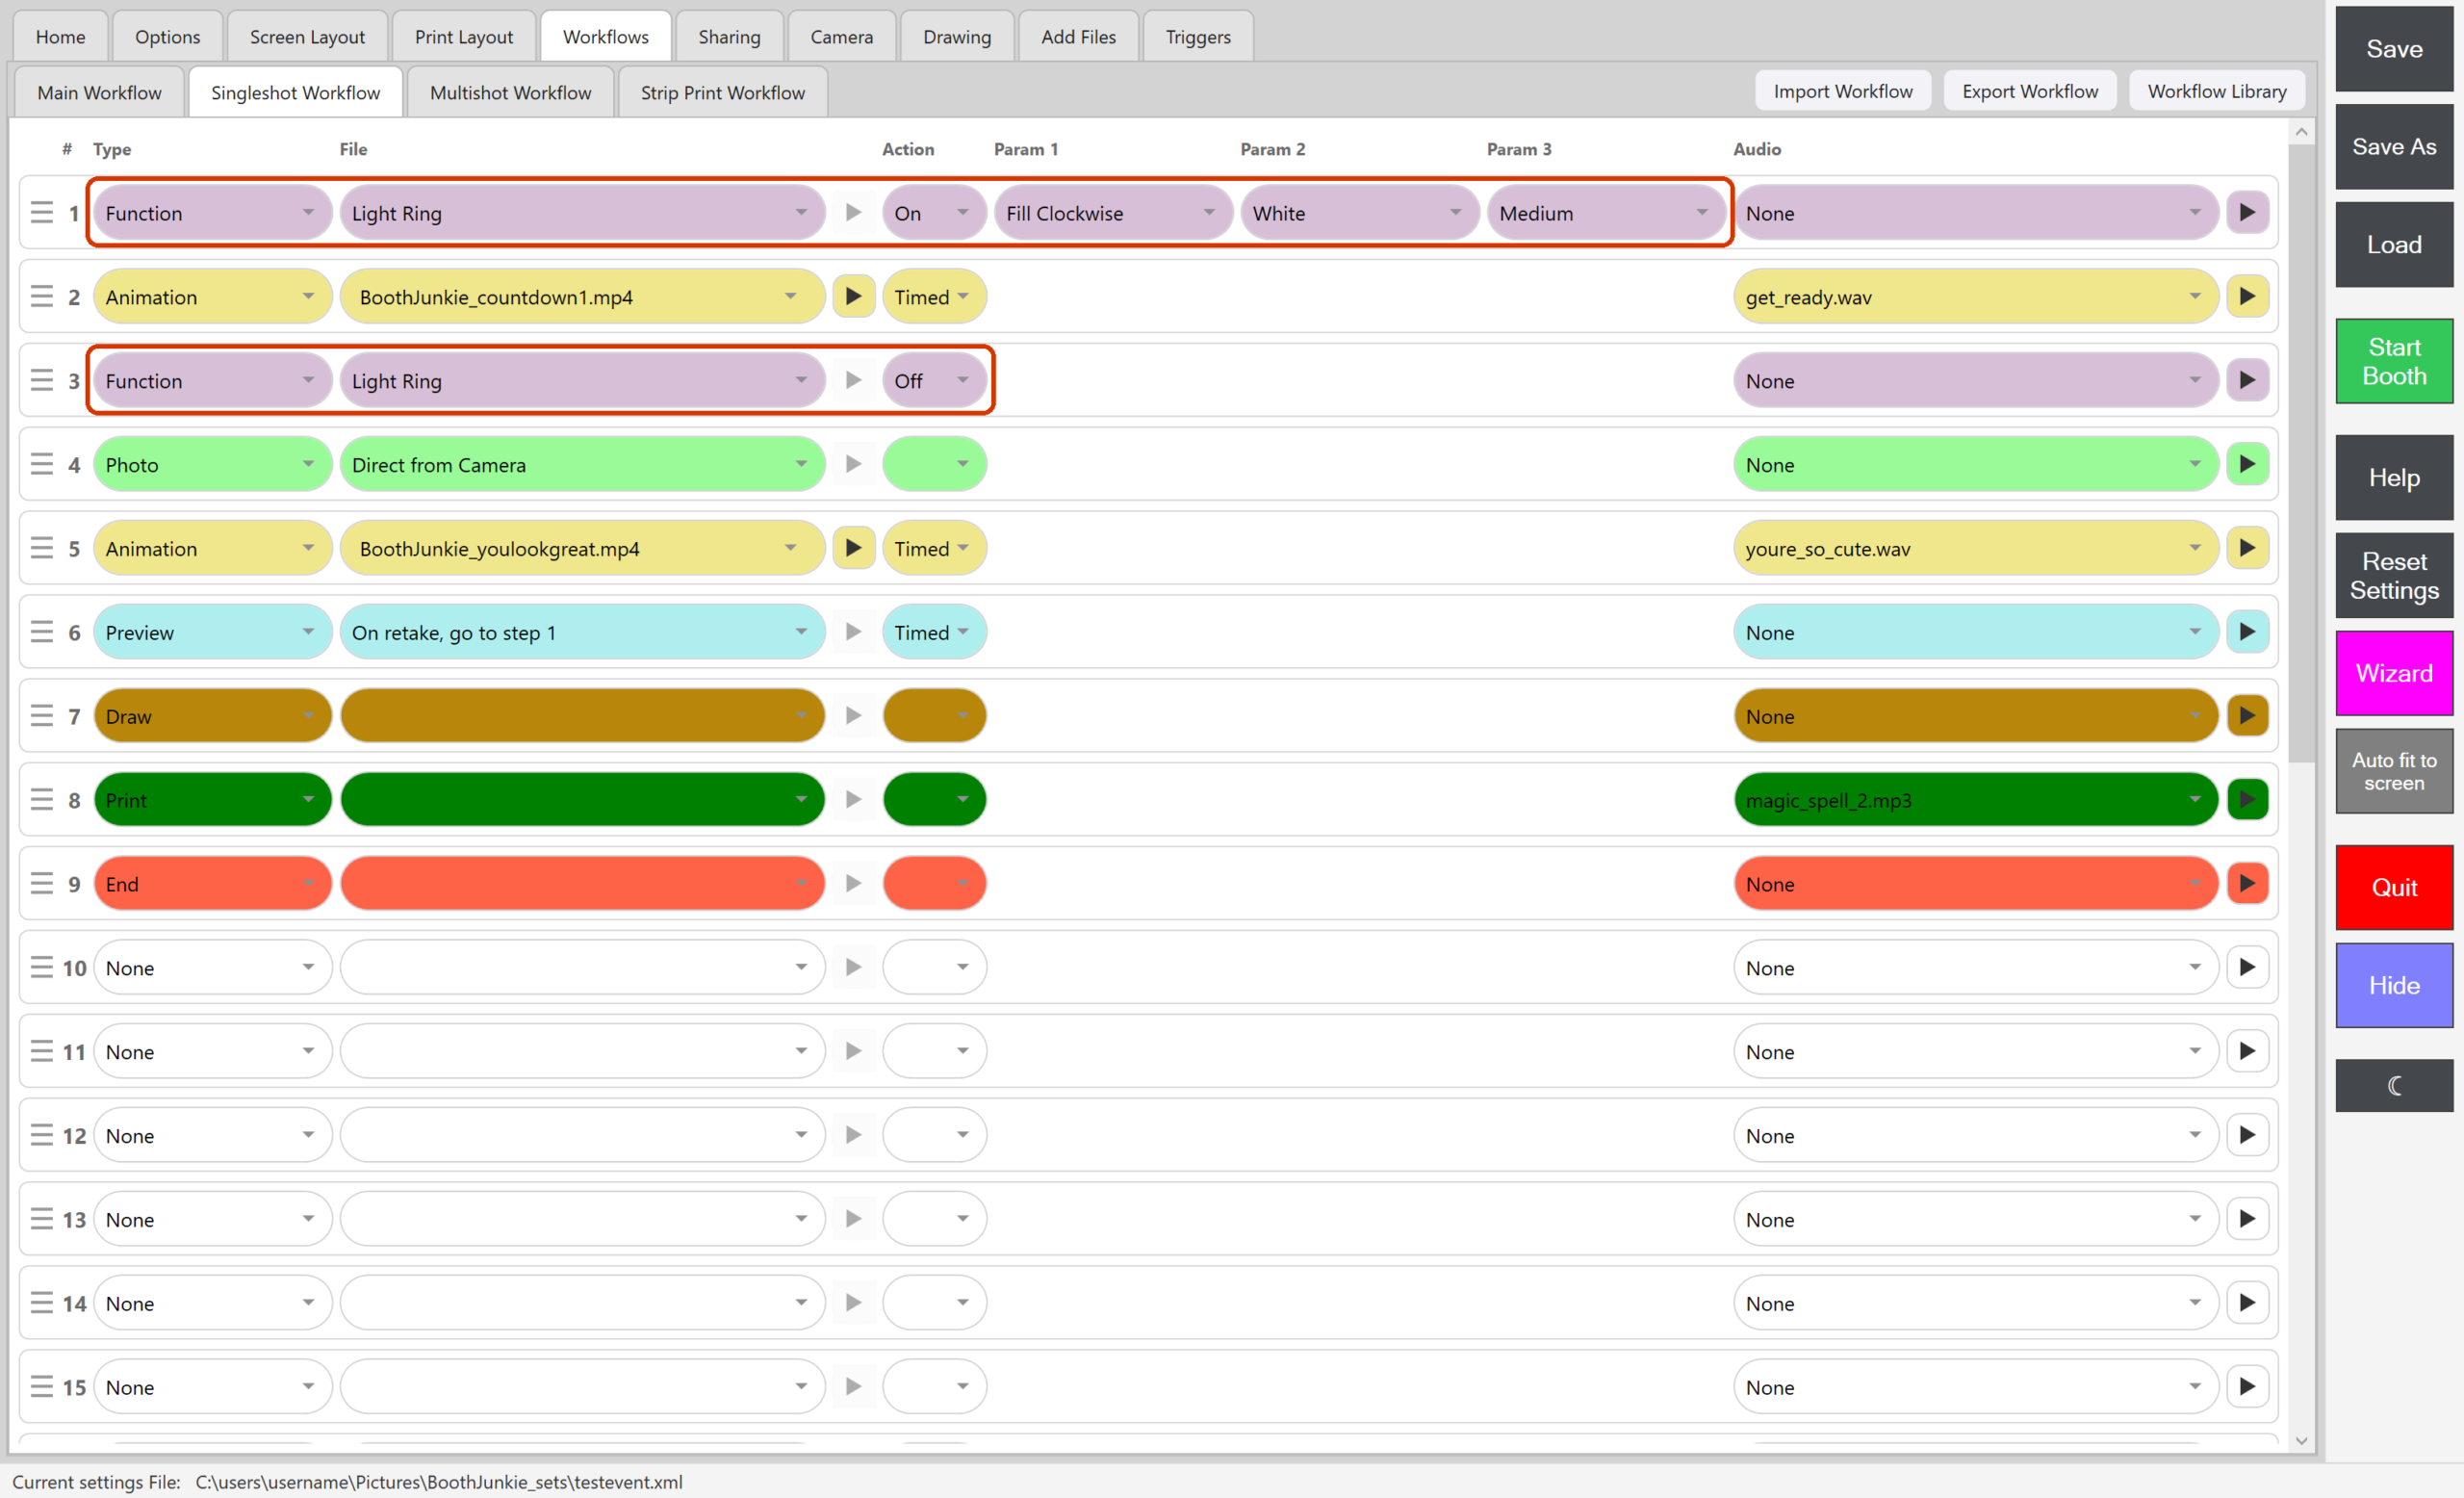
If guests can retake, send the retake back to the On step, so the ring lights again for the new countdown. In this example, the Preview step is set to On retake, go to step 1. In a Multishot Workflow, use the same pair for every shot.
Add the Light Ring steps
A Light Ring step can go in any of the four workflows: Main Workflow, Singleshot Workflow, Multishot Workflow and Strip Print Workflow.
-
Go to Admin Panel → Workflows and open the workflow, for example Singleshot Workflow.
-
On the first row whose Type is None, set Type to Function and File to Light Ring.
Result: Action shows On, with three empty lists beside it: Param 1, Param 2 and Param 3.
-
Choose the pattern in Param 1, the colour in Param 2 and the speed in Param 3, as in row 1 of the picture above. Always choose all three: an On step with them left empty sends nothing, and the ring doesn’t come on.
List What it sets Choices Param 1 Pattern Rainbow Spinner, Spinning Rotator, Fading Chase, Glitter Bomb, Fill Clockwise, Fill Anticlockwise, Roll Clockwise, Roll Anticlockwise Param 2 Colour White, Red, Green, Blue, Purple, Yellow, Cyan, Orange Param 3 Speed Slow, Medium, Fast Rainbow Spinner and Glitter Bomb use their own colours, whatever you choose in Param 2.
-
Drag the row by its handle to where the ring should come on, for example just before the countdown Animation.
-
Add the Off step the same way, but set Action to Off. It needs no pattern, colour or speed. Drag it to just before the Photo step.
-
Press Save, then Start Booth.
Result: When a guest’s session reaches the On step, the ring starts its animation and the workflow moves straight on. At the Off step, the ring goes off.
Good to know
- A Light Ring step has no screen of its own: it sends its command to the ring and the workflow moves straight on. If no ring is connected, the step does nothing and the session carries on.
- The ring stays lit until an Off step, Toggle LED Ring (below) or the 3-second test switches it off. Booth Junkie sends nothing to the ring when a session ends or when Booth Junkie closes.
- To start every guest with the ring off, put a Light Ring Off step first in the Main Workflow. Booth Junkie runs it at Start Booth and every time it goes back to the Main Workflow.
- Before you close Booth Junkie, check the ring is off. If it isn’t, click the green Light Ring light (it lights for 3 seconds, then goes off), or unplug the cable.
- A Light Ring step is saved with the workflow, so it goes with an exported workflow. The other PC needs its own Light Ring plugged in.
- Ideas: give each shot type its own colour, change the colour for each shot in a Multishot Workflow, or match an event’s theme, with a calm pattern at Slow for a wedding and something livelier at Fast for a party.
Switch it on and off by hand: Toggle LED Ring
A Keyfob button, or a Phidget input on Admin Panel → Triggers → Phidget Inputs, can run Toggle LED Ring. Choose it in a button’s list on Admin Panel → Triggers → Keyfob. See Setting Up a Keyfob.
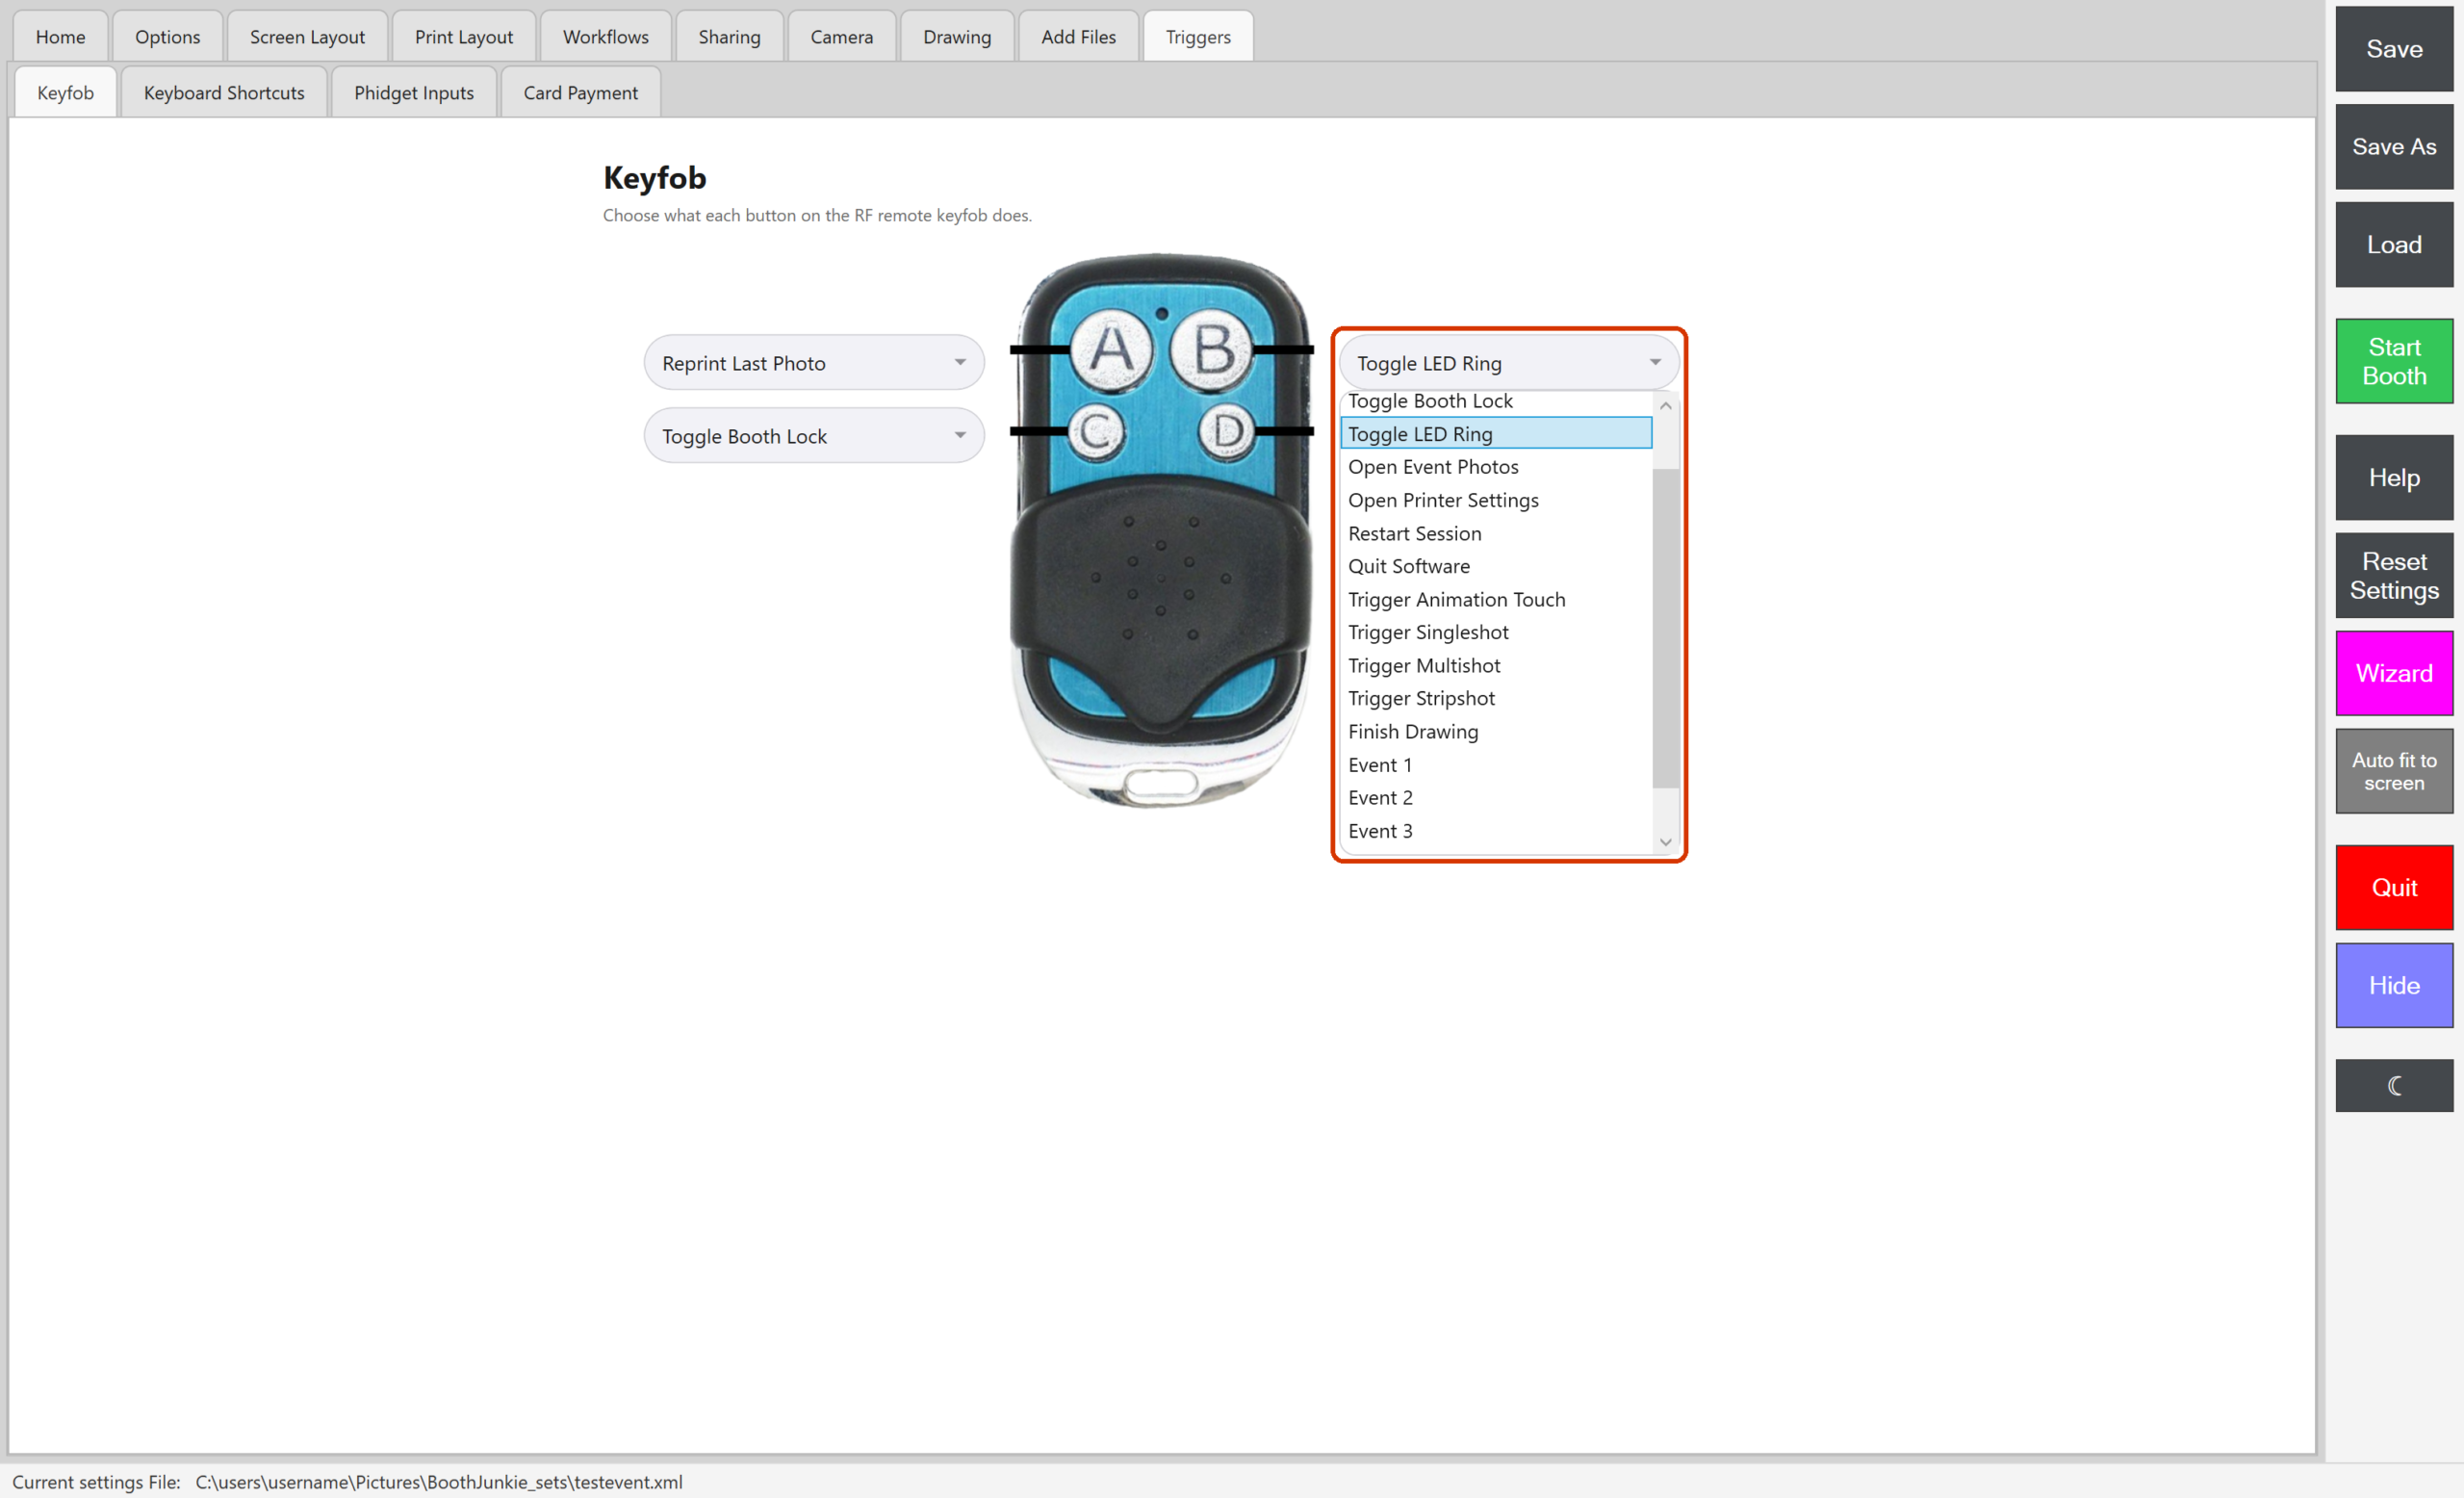
Each press switches the ring on or off. When it switches on, the ring uses its last settings.
Good to know: It goes by what Booth Junkie last sent
If a workflow step or an earlier press switched the ring on, the next press switches it off. A ring that was already lit when Booth Junkie opened counts as off, so the first press changes nothing you can see, and the second press switches it off.
Good to know: Not the PBUK Magic Eye
The PBUK Magic Eye is a different product, with its own Magic Eye entry in the File list. See How do I use a PBUK Magic Eye?.
Related articles
- The General Tab: Event Name, Rotation, and Licence Info
- Main Workflow vs. Shot-Type Workflows
- Setting Up a Keyfob
- Preventing Windows From Powering Down Your Booth’s USB Devices
This guide is from Booth Junkie, photo booth software for Windows that has supplied the photo booth industry for 10 years. It runs enclosed booths, selfie pods and magic mirror booths with a Canon DSLR or a webcam, prints to any Windows printer, and sends photos to guests by WhatsApp, SMS and email.